Wednesday, September 30, 2015

Historical Sew Monthly Challenge #9 ~ Brown

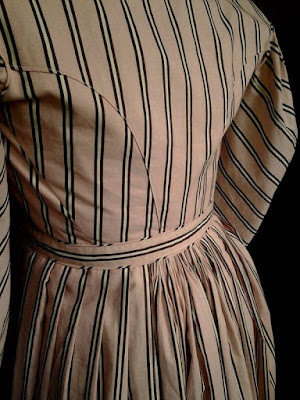
I did it! I finished my dress in time for the Historical Sew Monthly challenge #9. The dress was completed earlier this month but I didn't get a chance to take pictures until today. So, I present to you, my entry for "Brown".

What the item is:

This is a basic 1860's style day dress, made in a less dressy fabric and suitable for daily wear/work. It has a tucked bodice, pleated skirt with gauged back section and one piece coat sleeves.

The Challenge: 


Brown. The fabric is pink with brown stripes. 

Fabric: 

Striped cotton for the main fabric and white cotton for the bodice lining. For the hem facing, a cotton print in red and white. 

Pattern:

My own. The bodice is draped, the sleeves are drafted and the skirts are 4 rectangular panels.


Year:

1860-1865-ish.


Notions:

Hook and eyes. Cotton cord for piping at the neck, armscyes and waistband.


How historically accurate is it?

Very. I used the machine for some parts but the areas that would have been stitched by hand in the 1860's are stitched by hand here. (Setting the skirts, sewing down the facings, attaching the hook and eyes, etc.)

Hours to complete:

I really don't know. Maybe 12.


First worn:

Today, for pictures. 

Total cost: $25 or so for the fabrics. 


Monday, September 28, 2015

Anne's Stays and Hooped Petticoat

Anne wasn't that enthusiastic about her chemise or drawers, but once I had her stays fairly started and kept calling her down for fittings she became more interested. And when she tried on her tiny hoop, she was hooked. "Look at me twirling!"


I really hate making toddler/child stays but did so for the simple reason that it does extend wearability. Because stays make the waistline adjustable. The skirts button to the stays and you can place the buttons a little higher or a little lower as needed.


So I made these a bit on the long side. I can move the buttons downwards about an inch if I have to next spring and coupled with the slightly-on-the-long-side-already length, I hope the stays will work for her most of next year.


They are minimally corded with a buttoned back and buttoned straps. The straps can be lengthened too by moving the buttons downwards as needed.


The hoop is so simple. Just two 1/2" steels sewn into the hem and a tuck of a plain petticoat. It's a modified version of my own hooped petticoat, which is copied from an original depicted in Costume in Detail, that has five 1/2" steels sewn into tucks towards the bottom of the skirt. Since she is so little she does not need five steels and I think two will work nicely, with a full petticoat or two on top.


I made the waistband out of plain white cotton and it buttons to the edge of the stays with six buttonholes. That's it! So easy.


Of course, shortly after taking these pictures she decided to take a spoon and splash in a skillet of cooking oil so, already, these have had to be washed. . .thankfully cotton washes up pretty easily! I'm sure these will have plenty of stains and wear and tear by the time she outgrows them. But hopefully they will still be in good enough shape to pass down to Rose.


Friday, September 25, 2015

Simple Toddler Chemise

Towards the beginning of summer I started some mid-19th century undergarments for my Ben-Boy but alas I fell away from completing them. This week I finally pulled out his chemise and cut a larger one to sew up for Anne. I finished them today and am not without hope that this evening I will be able to sew up some drawers for each of them. Gotta continue to make progress. The ball is rolling. Isn't he cute? 

This style is super super simple. It's based on a rectangle and cut all in one piece and the neck is lightly gathered into a neck band. It really can't get much easier! Here's a very rough diagram of how I cut these:

Earlier this year I found an incredibly soft, luxerious, heavy white cotton sheet at a garage sale. It was $1 and queen sized so I was sure there would be enough fabric there to make some undergarments for the babies. The oh-so-soft cotton would feel so nice against their skin. These are made from that sheet and there's still an incredible amount left over, plenty for drawers and a set of undergarments for Rose, and then some.


My oldest three sons were very accustomed to wearing garments like these since back when they were little we often attended reenactments. This was Benjamin's first time wearing anything like a dress and he thought it was hilarious. 


It didn't stop him one bit from quickly finding some rocks and sticks to scratch in the dirt. 

He moves fast, so it was hard to get many pictures. 


He will be getting a bodiced petticoat to go over his undermost things, but Anne will have stays, a little hoop and a button-on petticoat. She is very interested in the hoop. Maybe I can get those knocked out this weekend. It's supposed to rain, so will be very pleasant for sewing. 

Tuesday, September 22, 2015

1860's Work Dress Progress - Skirt and Finishing

The dress itself is done. I ended up sewing the hooks on late last night while baby Rose lay next to me on her blanket. Out of the fourteen hook and eyes to sew on, I got twelve done before she decided to start screaming. I count that a success. ;)

I still haven't made a collar, or cuffs or undersleeves. I have a few other things I need to finish first but a collar is such a simple thing to make, it shouldn't be too long before I have time to make one. I may or may not make the cuffs. They aren't strictly necessary and if I will be rolling up my sleeves most of the time anyway, not extremely useful. But the collar is a must have. 

I decided to pleat my skirt but left a little section at the center back unpleated. I cartridge pleated that area. This is sometimes seen on original dresses. It gives you a bit of wiggle room if your pleats aren't perfectly calculated and for me, I like it because I am not sure when I will be making another 1860's dress and this method shows what both knife pleating and cartridge pleating look like. 

The skirt was attached with the usual method of whipping to the edge of the bodice waistband, just under the piping. My dress won't close on the dressform but you can get a general idea of what it the opening looks like.  

The dogleg closure fastens the skirt at the side front and the bodice at the center front. 

I also made a pocket in one of the side front seams. I usually don't put pockets in the skirt but I thought it would be a very useful feature!

For the hem facing I used up the last bit of fabric I had left over from the 1810's dress. Not as wild a hem facing as I really wanted, but better than plain white! And it was white on one side, so didn't shadow through the hem. Thank you for the suggestion, Veysketh! 

I tried on the dress real quick and am really happy with how it has turned out. The hem just brushes the top of my feet so it will be able to be worn with just petticoats or with a small hoop. It felt so freaking awesome! One just settles comfortably into the familiar feel of it all. Yep, the 1860's will always be home. Even if I do like styles from other eras a lot better! It's me. 

Thursday, September 17, 2015

1860's Work Dress Progress - Bodice

I have been slowly working on my dress. I pulled out my old pattern, cut a mock up and waited a long time before fitting it over my corset. For some reason it seems like so much work to put on the corset. It was done at last, though, and the bodice was fitted.

Yep, that's an unmade bed in the background, and my child playing with her baby dolls on it. Anyway. The fit was pretty good but I had to do a bit of finagling with the length. The back needed to be lengthened quite a bit and a little bit of length taken off the front to make the waist even all the way around. I also had to raise the neckline a little bit and take a half inch off each side seam. But at last the details were worked out and I cut out my bodice fabric and lining and put it on inside out to pin in the darts. 

Darts are terribly hard to pin evenly. In my experience there is just no other way to do darts with extremely fitted bodices except to pin directly on the body. I've tried fitting mock ups, tracing the dart lines and transferring them to paper but they always come out somewhat off. My method is not that great since pinning them with the bodice inside-out results in the darts switching sides once the bodice is finished but it's the lesser of the various dart-evils. 

After pinning in the darts I sewed them imperfectly with the eyeball method. Then I checked the waist length one last time and sewed on a waistband. I had barely enough fabric to eek out a waistband and the littlest scraps were pieced for piping, but it was done. 

I had just barely enough piping to do the neckline and armscyes, but those got done too. Relief! 

For sleeves I decided very basic one piece coat sleeves were the most economical choice, fabric-wise. It came out to be that cutting them on the bias took less fabric than cutting them straight. Who knew? So I have bias sleeves and I like how they drape very much. Here is the bodice so far - all ready for the skirt to be whip stitched onto the bottom of the waistband! (the skirt, however, is not even sewn together yet.) 

The finished self-facing on the front opening, the darts and the waistband lining: 

Curved back tucks: 

View of the inside bodice: 

I have 4 full panels left to make a nicely full skirt so that is next. The fabric is pretty lightweight so I'm not sure what to use for a hem facing but I want something fun - the problem is something fun shadows through the outer fabric! I may have to go with boring white. 

Then collar, cuffs or undersleeves, and fastenings. 

Thursday, September 10, 2015

New Baby Hobbit Dress

Over the last couple of years I watched, with anticipation and increasing excitement the release of three new movies by Peter Jackson depicting The Hobbit  by J.R.R. Tolkien. I was really excited to see the costumes and although the movies left me less than satisfied (yeah. . .to put it mildly. . .) I really enjoyed the costumes worn in the scenes from Hobbiton (and Thranduil was awesome. Oh, so awesome).

Actually all the costumes were pretty good. The dwarves, the Laketown residents, the attire of the elves. Beorn. And yes, that sentence was purposely one word. Beorn deserves his own sentence. ;) It was interesting to see how the costume designer made the hobbit costumes look different from those worn in the original Lord of the Rings trilogy. Since The Hobbit is set earlier, the costumes reflected the difference in time and had a more 18th century vibe. The clothing was also more diverse, instead of the rather standard chemise-bodice-petticoats outfits worn by women in The Lord of the Rings. 
girls costumes from The Hobbit
Awhile ago I made some baby dresses based on hobbit costumes from The Lord of the Rings. I just finished up a new one that is similar but has some design differences that are inspired by the costumes in The Hobbit. 

I used the same pattern but made the stomacher a bit wider, and made the overskirt split down the front to reveal the under petticoat. 

The back is drawn up as a nod to the polonaised gowns of the late 18th century. To keep with the earthy, organic feel I used natural cotton cord for this instead of ribbons. 

This dress was a complete pain to sew because of the material used. Brocade! Upholstery brocade! It not only was thick and hard to manage, it also raveled like crazy and liked to magically grow and shrink on me. I had a rather big amount of this material at one time and this was the last of it. For that, I am thankful. It did make a cute dress though!

This is also available in the shop. Now to turn my thoughts to the striped 1860's dress. Although now I kinda want to have a reason to make a hobbit dress for me. That can wait though. No more movies coming out. :( Boo. Although I'd definitely watch a mini series based on the residents of Hobbiton if anyone ever decided to make one. 

Love,
Sarah

Sunday, September 6, 2015

1810's Dress! All Done!

Finished it yesterday!

Super pleased with how it came out. I've had the material awhile and it felt good to use it up. Although the actual print is red and white the overall affect is a pleasant plummy pink. 

I really like the way the trim worked out. It wasn't very difficult, either so I may utilize this more in the future. For some reason I always thought this type of trim would be too time consuming. I cheated and used my sewing machine to sew in the cords, but its not noticeable with the fabric ruched over the cording. 

To make the trim, I tore strips of fabric 1.5x the length of the area to be trimmed. I pressed down a seam allowance towards the wrong side and inserted a cord in the fold, and stitched close to the fold. Then it was a simple matter of drawing the fabric up on the cording to the right length. The trim is sewn to the dress by hand with uneven running stitches. 

The skirt is fairly narrow, made of just two widths of 45" fabric. I always forget how little the skirts were in this period of history, especially compared to the over-the-hoop skirts of the 1860's! In one of my books about New Salem (c. 1830's-ish with the area settled in the few decades prior) a contemporary observer wrote that the skirts worn by girls and ladies were so narrow they could not jump across a creek. I will need to look up that reference for the exact phrasing. I found it an odd statement until I realized how narrow the skirts really were, and yes, it would be necessary to draw up the skirts with the hands to jump across a creek. (not that I've ever tried it, but one can use ones imagination. ;) ) 

The very low V neckline would be filled in with a chemisette or kerchief. 

It's available in my shop and now I need to find a use for the remaining yardage I have of this particular fabric. It may make a nice childs dress. We'll see. On to the next project. 

Love,
Sarah

Friday, September 4, 2015

Sewing a Regency Gown

The week has flown by and I am shocked to realize that yes, it is Friday already. The week has been full of school meetings, doctor appointments, mowing the grass, work and the business of everyday life. This week I have been sewing up a new dress for the shop and am very close to finishing it. That is my project for this afternoon. 

This style of dress is transitioning from the columnar styles of earlier years into the fussier gowns of the 1820's. I made the bodice a low V crossover with ruched trim and the sleeves are quite full and long. The skirt is A line in shape and is decorated at the hem with a wide
 ruched band of fabric, and the bodice closes at the back. 

I like this style quite a lot. This particular one always brings me back to my very early forays into historic clothing. Even before I was introduced to Civil War reenacting back in 1998, I fell in love with Lincolns New Salem Historic Site when, shortly after our move from the east coast, my dad took all of us there for a 4th of July. Over the years I went back many times and took the volunteer course, which immersed me deeply into the history of that particular time and place and gave many clues as the attire of the citizens of the town. Which were, mostly, similar in style to the dress I'm making now. 

Ah! Fond memories. New Salem will always be dear to me and this style of dress will be my particular favorite. 

I truly appreciate the effort of historians and volunteers to maintain historic sites like these. Having just heard (yet again) that because of the dismal state of the Illinois budget that most museums are due to close I am half sad, half furious. Mostly resentful of the carelessness that the state has exhibited in the distribution of its monies that has resulted in the closure of many state historic sites over the years. I wish there was something I could do to help keep these places open! I feel pretty helpless and that feeling fuels my anger at the current state of things.

I dream of the days when I will be more free to do something - mainly volunteer! Now, with six children to raise, my ability to do much beyond taking care of them is limited. But I am happy to realize that while I do have these years with them I can teach them to respect and appreciate the unique history of areas they know and love and perhaps instill in them a desire to keep that flame burning when they are older. 

 And for no reason at all, here's some silly pictures of my little girlie. She is so sweet! Oh little baby girl, there aren't enough minutes in the coming years to tell you all I want to tell you and to show you all I want you to know. 


May you all have a very joyous holiday weekend!

Love,
Sarah