Sunday, February 26, 2017

Civil War Wear for 8 Year Old Boy

I've been pushing myself to get the kids clothes ready for the reenacting season sooner rather than later. Last year we managed to get by but we were pretty bare-bones with our impressions. A benefit to having so many children is that garments can be passed down. This year no one needs all new everything, so it will be nice to have more time to work on accessories and to put more time into creating a few good, useful things that will round out the look. It's been really fun so far! I hope this weird burst of productiveness lasts!

So this month I wanted to focus on getting Malachi in proper attire. After a try-on of last years clothing I figured that he could use Judah's waistcoat and jacket from last year with a new base outfit made in his size. He is 8 now, and in a modern size 8/10.


In the period he could still wear styles geared towards younger boys but he has been wanting real menswear for a while now. So this year was it. I was actually pretty sad as I sewed up his new things! My last little boy from what I think of as my "original set" ;) I'm so, so glad that I have my Benjamin and will have a little boy to dress for events for a while, yet!


I sewed him up a new shirt, trousers, braces, cravat and cap. His cap from last year would have worked just fine but he specifically requested a grey hat. This one is made from an old wool suit jacket that would have otherwise been donated. It made a fantastic little cap! The inside is lined with white cotton and the band is lined with silk.


He had trouble with his necktie last year. He plays very hard and is extremely active so it kept coming loose. This year I made him a pre formed tie with a narrow band that hooks closed behind the bow.

I had material left over from making the waistcoat last year so that is what we used for the trousers. I tried a full lining with these. I don't usually line trousers but this material is fairly light and, like I said, this kid is active. Lining will (I hope) extend the life of the trousers and it adds some body so that the legs hang nicely. The braces are "poor boy" suspenders made of cotton twill.


The shirt was drafted based on measurements from one of his modern button ups and drawn using the Laughing Moon Men's Victorian Shirt pattern as a guide for shapes. It came out quite cute! I used a nice quality red and white dotted cotton and china buttons. Next time I will make the collar and band just a bit narrower and drop the shoulders a little more. Otherwise I'm really happy with how it came out!


His shoes are pull on black leather riding boots with elastic gussets from eBay. Not 100% period correct but they give a good look and are sturdy shoes that will wear well. Not bad for less than $20!


He will be wearing this to a school demonstration in a few weeks. It's a great feeling to have him all ready to go well in advance. I'm proud of my little guy! He's grown so much. It's been fun seeing him grow up in the hobby!

Thursday, February 23, 2017

Finished Civil War Cold Weather Things

I figured I better blog these before I have lost all interest in them. I finished both my mantle and winter bonnet last month and had optimistically hoped for at least a little bit of snow on a day I was available to take pictures. The snow never materialized, winter seems to have departed hastily and now we are enjoying summer-like temperatures (wut?) so these, taken during an outing a few weeks ago will have to suffice.

I am very happy with how both the bonnet and mantle came out. The colors are not ones I would have chosen if I had been able to get all new materials. But considering these were basically free projects that made use of some leftover scraps, I could not be more pleased. The mantle is very warm and it is moderately heavy. It was almost too warm on the day these pictures were taken. Although I was down by the water and there was a nice breeze it was still not quite cold enough!

The bonnet is quite light and since it is not made of wool it is not as toasty warm as the mantle. This works out well, though, at least for this year! I like this style quite a bit since it is close fitted and very snug. The shape is nice, too, and doesn't make the face appear so narrow as other styles of the period. I ended up edging it with cream silk ruching which softens the lines and helps tone down the olive green of the main fabric.

I wore leather gloves and a took a muff - both completely unnecessary. I will have opportunity to wear these again next month if it gets cold again. Otherwise they will wait to be worn until fall.

One nice thing about clothing from this period is that it does not need to match or even coordinate. I wasn't sure how this would all come together but I think is, in the end, pleasing.

Friday, February 17, 2017

Altering a Basic Regency Gown Pattern for Drawstrings

The Sense and Sensibility pattern for a girls regency dress is one I have used a lot. Its basic form is classically regency with a high waisted, fitted bodice and a moderately full skirt. There are short puff sleeves or long sleeves to choose from. The gown is back fastening with buttons.

While I do like the original style of the pattern, it's always fun to change things up a bit and see what other styles you can create. I have found that the girls regency dress pattern makes a terrific "pattern block" from which you can create a ton of different styles. One of my current projects is creating a regency era dress for the daughter of a friend and I thought I'd document how to alter this basic pattern to make a dress that is fitted with drawstrings. (The original pattern includes fabulous directions on how to make a drawstring-look dress using elastics. This dress uses ribbon and twill tape to get the gathered look.) Gathered dresses are perfect for garments that are meant to be used by rapidly growing kids and since the sizing is so adjustable its great if you plan to eventually hand the garment down to a different child. It's not quite one size fits all, but it's close! 

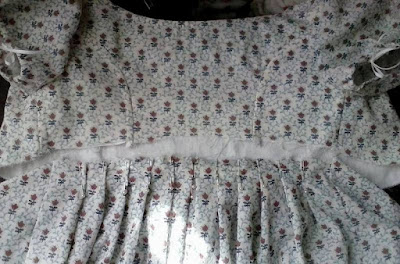
Cutting the dress is only a little different. The back bodice has the center back line placed on the fold. This makes a one-piece center back. The side backs are cut as usual. The front bodice is cut placing the center front line about 2"-4" from the fold (depending on how full you want the gathers to be). The sleeves are cut as usual. For the skirt, I cut two rectangles as long as my desired waist-to-hem measurement + 2" for seam allowance and a narrow hem and as wide as the fabric, usually. The back skirt remains a rectangle and the front skirt is slightly shaped into an A-line, with the top edge of the skirt equaling the bottom edge of the front bodice. 

The bodice is sewn together. For this dress I cut a lining of white cotton and treated it as one with the outer layer. To finish the seams I turned under the seam allowance and slip stitched it down. This creates a nice firm finish to give a little structure to the dress. 

You can see the extra width in the front bodice. The neckline is narrowly hemmed by hand. The sleeves are set in as usual.

For these sleeves, I narrowly hemmed the bottom edge and ran a tape through the hem so that they are adjustable. It also makes ironing a lot easier!

The skirt is seamed together at the sides. I used french seams for this skirt. I don't think that French seams are very common on original gowns but it makes a good strong finish and is quicker than finishing the seams by hand. The back skirt is pleated to fit the back bodice:

Matching side seams, the skirt is pinned and sewn to the bodice, right sides together.

Two tiny buttonholes are worked just above the waist seam and right next to the side seam on the front bodice. 

And an eyelet worked in the hem of the neckline at center front.

To make the casing for the waist drawstring, the seam allowance is turned up towards the bodice, the raw edge folded over and slip stitched down. 

The seam allowance between the skirt and back bodice can be finished in a variety of ways. For this dress I just turned under the seam allowance and slip stitched it down. For a heavier fabric this may be too bulky. If that's the case I will usually just bind the seam. 

After the skirt hem is done, all that is left is to put in the drawstrings! I used cotton twill tape in the neckline and a ribbon in the waist. The waistline drawstring goes into the casing via the buttonholes, so that the ribbons come out at the sides and tie at the back.

Draw up the strings to fit and that is it!


Sunday, February 12, 2017

Pink and White 1950's Shirtwaist Dresses

Mommy-daughter dresses were a thing in my grandparents generation. I guess they were a thing when I was young, too, but I thought they were ugly and stupid. (Not a terribly hard opinion to have about early to mid 90's fashion. . .) Check out these adorable duos (and a trio) from about thirty years before I was born!
1950's dresses from Pinterest


1960's dresses from pinterest
It was Anne's idea to make Valentine dresses. I told her she could choose any red or pink fabric I had on the shelf and I would sew matching outfits for her and Rose. I recently acquired the Girls Classic Shirtwaist Dress pattern from Sense and Sensibility and wanted to try it out. Anne picked this crisp pink and white cotton that a generous friend gave me for the girls almost two years ago. While I originally intended to make just the two dresses, for the girls, I found that there was enough fabric left over to make a dress for mommy, too. So mommy-daughter dresses it was! (FTR, all 3 dresses, in the pattern sizes 2, 6 and 16, took 4 yards of 55" wide fabric. This pattern is a very thrifty design!) 


I used the e-pattern version so the whole thing was printed out on almost 50 sheets of paper and then taped together. After that I traced each size I needed onto plain white tissue paper. The sizes all seemed to work out well for us although I made a few adjustments that I will go into.

Size 2 dress ~

I made Rose's dress in the smallest size the pattern offers. This translates nicely into a modern 2 or 3T. 

Instead of using the skirt pattern provided I just cut two rectangles of fabric to the dimensions I needed. Generally 1.5 - 2 x the measurement of the edge being gathered to is sufficient for a nice fullness. For this littlest dress I made a narrow hem and machine sewed it into place. The fabric is stiff enough to provide plenty of body at the hem on such a small scale dress. 


To finish it off, I used some vintage cream colored buttons I got from a local antique shop last summer. 
I love her tiny ponytail!

Size 6 dress ~

Anne's dress was made in the size 6. While this worked out fine I think I may go with a size 8 or even 10 in length next time. Her dress came out a little short waisted. She is a tall kid with a long waist. I left off the darts in the back bodice since with the darts sewn in she found the waistline a bit too fitted for comfort. 

Anne wanted short sleeves. I love how these came out! They are so simple. The cuff is made by sewing a wide hem and folding it up. That's it! So easy!


I tried to learn how to make machine buttonholes for the girls dresses. I have a 1 step buttonhole attachment on my machine but practicing with it was not successful. I did at last make a sort of buttonhole with a narrow tight zig zag but next time I will definitely do the buttonholes by hand. 


Anne chose dark pink buttons. She wanted heart shaped buttons but when I told her it would be a few days til I could go to the store to get some she decided to go with what I had on hand. And she loves her finished dress! I'm thrilled to see her so happy with it!


Size 16 dress ~

My dress was made to the largest size included in the pattern. I knew I'd have to make a few adjustments since I am lady sized and not girl sized. The pattern instructions include detailed steps on fitting a toile, or mock up, so I made two mock ups before cutting into the dress fabric.

The position of the front bodice darts was changed and the darts were deepened to accommodate a larger bust-to-waist ratio. I also had to make a narrow upper chest adjustment to get rid of some wrinkles between the shoulder and armpit area. For that I followed the instructions from A Sewing Life, here: Altering for Narrow Chest
Went for a 1960s rather than 1950s hairstyle. Kinda a flop.
I also took off 1/2" at each seam on the back bodice piece only. This brought the side seam into the right position at the side of the body. I needed to deepen the curve of the sleeve heads to get them to set in smoothly. I found the cuffed elbow sleeves not to be fitted enough at the elbow so I took them in with a pleat at the back of the arm and tacked it down by hand. I sewed a button on each sleeve where it was pleated so that it looks intentional. :) 

While the length was okay, I wanted it just a bit longer. I didn't decide to add extra length til the last minute so I just put a waistband on the edge of the bodice. This added about 1/2" or 3/4" to the length. My buttons are amazing pink glass vintage buttons I got at an antique mall last weekend. LOVE THESE BUTTONS!

The skirt is about 90" in circumference. I didn't have enough length in the skirt to make a turned hem so I made a hem facing, just like a facing done in 1860's dresses. This worked out really well and added a lot of body to the hem. For the pictures, Anne and I are both wearing cotton petticoats under our dresses. I don't like the feel of net or tulle crinoline petticoats so the modest amount of fluff a tiered cotton petticoat gives is just fine for us. :) 

Petticoats!
It's actually pretty fun to have matching dresses! Not only will these be great for Valentines Day, they will be fabulous throughout spring and into the summer. Bluegrass concerts, old car shows and ice cream socials! I haven't worn vintage style for a really long time and it feels great to get back into it. 

Get everyone to look at the camera at the same time is impossible.

Yes, she has her finger up her nose. . .

This front opening dress is nursing friendly!