Saturday, April 28, 2012

1860's Gathered Drawstring Dress


One more item (almost!) to check off my pre-event sewing list. This gathered drawstring dress for Becky is nearly done, lacking only the hem facing and the buttonholes. I find that when I get close to the end of a project my inspiration to actually finish it wanes. Hopefully I will get the finishing details done today and it will not hang indefinitely hem-less and buttonhole-less in the sewing room. Well, it can't, since Becky needs to use this in three weeks but let us hope it does not hang unfinished for those three weeks.

This dress is made from one of those fabulous $1.50/yard Wal-Mart deals. I adore the cheery yellow color (it reminds me of of happy summer sunflowers) and the little swirly dots on it in black and white. Becky told me she is not much of a frilly or floral type of girl so this fabric was suited to her exactly.

The style is a new one for me. Becky desired a somewhat flexibly sized dress to accomodate both weight loss as well as to be a potentially maternity-friendly style. The typical day dress of the 1860's was made quite form fitting in the bodice and did not allow much room for expansion either in the bust or the waist. (You can see an overview of a basic day dress at this blog post here: Anatomy of an 1860's Dress ).

These photos are reposted from there, showing how the typical cotton day dress has the outer layer of fabric (a.k.a. the "fashion fabric") tucked or gathered at the waist;

While the lining layer is smoothly darted to fit the corseted body:

Now, the sacque and the wrapper are flexibly sized garments but this dress is constructed along the same lines as the average day dress. However, it sports a semi fitted front waistband that can be drawn up to fit with drawstrings. I first heard about this style when I was pregnant with Judah and since then have planned to make a dress like this but, obviously, have never got around to it:

"I have a few dresses in my collection that I very likely were worn by women when they were pregnant. What makes them unique is that while they are just like any other gathered dress of the period in the back, they have an encased drawstring (often a double drawstring, pulling from both directions) inside the waist. Unlike wrappers, they don't open all the way down the front, but they do have a center front skirt opening. (While this is rare in silk or fine wool dresses, it isn't all that uncommon in cotton dresses for some reason.)" ~ Glenna Jo Christen, The Sewing Academy

For this dress I used the basic fitted bodice pattern, that I draped on Becky last week, and modified it. The resulting bodice has a sort of fan front look, as the shoulders are gathered to create fullness over the bust and then the front waist is also gathered. Visually this will create slanting bands of gathers from the shoulder to the front waist.

I was afraid of the full shoulders blousing out at the upper chest. I have no idea if this is a period correct solution but I did it anyway; I cut a small lining piece from the fitted bodice pattern that will hold the gathers in at the upper chest. This lining piece is approximately the same size as a yoke would be on a yoked style of dress. So, it leaves plenty of room for chest fullness but it will make the upper bodice fit smoothly to the body.

The waistband is constructed to be 5-6" larger all around than Becky's corseted waist measurement. I sewed the waistband into two channels from the side seams to the center front and threaded laces through the channels to create the drawstrings. The ends of the laces are firmly stitched at the side seams so they won't pull loose when drawn up:

The laces emerge from little buttonholes on the inside waistband, an inch and a half from the edge. This way you won't see the ties from the outside of the dress. The dress front can still overlap and hook closed like any normal day dress.
the gauging threads are loose here as I had not tied them off yet - excuse the sloppiness of their appearance here!

The skirt is made, as usual, from 4 panels of 45" wide fabric. I decided to gauge the skirt since I thought that would work best with the drawstring waistband - pleats gathered up on a drawstring may not hang well. Here you can see the side front of the waistband with the drawstrings pulled up: The gauging is somewhat distorted but not visually jarring.

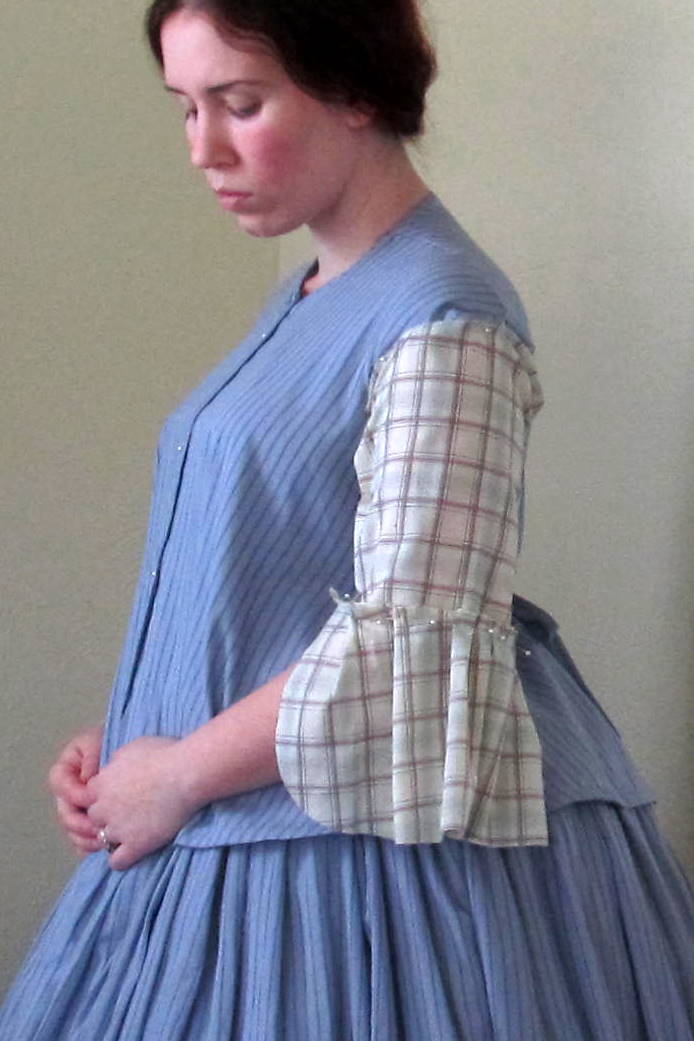
The sleeves are basic coat sleeves with a slight variation to continue the "gathered" theme. The back seam of lower sleeve is much longer than the front, so was gathered to fit:

The dress can be worn with or without undersleeves, depending on the activities Becky is doing. Without undersleeves the dress sleeves can be rolled or pushed up on the arm. With undersleeves, and the white collar and neck bow the dress is proper enough to wear for church or to any other social function where a nice day dress is acceptable attire.

Now to finish that hem and get those buttonholes made!

Love,
Sarah

Thursday, April 26, 2012

An Antique for the Anne-Girl

Thank you all for your overwhelmingly positive comments about the sacque outfit. I am glad you all like it, and although I cannot truly say I *love* this ensemble, your words have helped reconcile me to it and I think I will be able to wear it with a bit more than simply tolerance. I think we have three events to attend before the baby gets here and as it is certain I shall only get bigger between now and then a sacque WILL be a comfortable and roomy thing to wear!

Thank you also for your prayers about the sonogram we had on Tuesday. Our little girl is measuring (according to their best estimations, which may be, and probably are, somewhat off) a bit smaller than average for her age but she is still well within the range of normal and her physical development is right where it should be. The 2D ultrasounds are never very clear but we to see her tiny face and she quite resembles her brothers, I must say. I think she looks quite a bit like her brother David; small and finely shaped with tiny features.

Anyway, at the candle lighting ball we attended last weekend, the dance mistress, the lovely Mrs. M, surprised and delighted me with this small pink gown. Since that time I have had more opportunities to sit and marvel over the fine workmanship on this whispery pink organdy dress.

The dainty handstitches (the dress appears to have been entirely stitched by hand),


The minute slips of buttonholes and teeny-weeny buttons:

The wide hem cut and stitched in scallops:

The still like-new tag attached to the inside of the neckline:

Some quick google searches of "Alfred Leon baby dress" turned up similarly designed gowns dated from the 30's, 40's and 50's. My personal thought? The 1940's, just based on the cut compared to other 1940's baby dresses and the relative slimness of the skirt compared to other Alfred Leon dresses from the 50's that have very gathered skirts, indeed.

I will feel quite special putting my little darling in an approximately seventy year old dress. Imagine! I wonder if any other babies ever wore this dress, and who they were, and what became of them. Now to construct a properly vintage-looking baby bonnet to go with the gown, and finding little ruffly ankle socks and strappy shoes to complete the look. That is work I do not mind one bit. ;)

The only disappointment with the dress comes from Mr. Malachi, who demanded tearfully to know why the dress is not for *him*. I suppose that is an effect of reenacting the 1860 period with a certain young man who wore dresses at events until last fall. He likes them. And he likes the color pink. He did at least admit at last that even though he cannot wear the dress he will like to see his little sister in it. I think she will not want for gentleman admirers. :) David's old red plaid tunic, which has faded pink, Malachi now accepts as tolerable substitution.

Love,
Sarah

Sunday, April 22, 2012

The Sacque and Petticoat of Purple, Pt. 4: Finished!

The sacque is done! I finished it late last night, per David's suggestion that I do indeed add the contrasting buttons down the front. I just cut some scraps of the trim material and gathered them around shell buttons to make the covered buttons. I had to use two layers of fabric to cover the buttons since the material is so very thin. Still, I think they came out pretty well and I do think they definitely add a finished dimension to the garment. (and help divert the eye from the faults in fitting, alas!)

The fabric I used for the trim is a very lightweight sage green cotton. I found it at the thrift store last year, two yards of it, and wasn't sure what to use it for. I think the color works well with the purply color of the main fabric. I was sorely tempted to do black trim but, well, I almost always do black trim so wanted something different for this. 

The trim was just sewn on with large uneven running stitches (short on the outside, long on the inside) so it can easily be removed and replaced if need be at some point in the future. 

So here is the finished sacque from the front. I must confess I am not as thrilled with it as I wish I was. I just feel huge and frumpy when I see pictures of how this thing looks from the front. I know it's partly the style of it, but still. Oh well. It is what it is. I think I'll always hate that subtle feeling of discontent, though. 

I like this view much better. Probably because the back is fitted with ties which means that at least from the back I don't look as huge. You can tell, a bit better, that yes, I *am* expecting a baby and that's why I need extra room in the front. ;)

And the side view: A lot of room for expansion, yet! On a slightly related subject, I do really hope Baby grows more; I am 24 weeks now and comparing photos of how big I am now (people still usually don't know I am pregnant unless I tell them) with how big I was with Malachi, or Judah or David at the same week of gestation is a bit unsettling. I have only gained about 5 lbs. so if you feel led to, please keep me and the wee girlie in your prayers. We go in on Tuesday for a medical sono to make sure she is growing and developing properly. As long as she is doing fine, I won't worry so much. One thing is for sure, this pregnancy has been vastly different so far than my pregnancies with the boys!

We tried to take some photos outside but it was simply too windy to get very many. Here is one that did come out to my liking:

And one more.

Love,
Sarah

Saturday, April 21, 2012

The Sacque and Petticoat of Purple, Pt. 3: The Sleeves

I didn't *quite* get the whole thing finished yesterday but I did get the sleeves made and the rest of the trim sewn on to the sacque. The sleeves redeemed the sacque for me. I may hate it when I recall the problems the sacque and I had, but the sleeves put me in a much better mood about it. They went together like a dream and I had absolutely no issues with the construction of them. 


What is left:
Hook and eyes
Decorative buttons (optional?)
White collar
Undersleeves

Love,
Sarah

Friday, April 20, 2012

The Sacque and Petticoat of Purple, Pt. 2: Patterning the Sacque

There is no reason to regret making a mock up, ever, of a garment. And there is every reason to be glad and happy about doing so. You can try it on, test the fit, adjust here and there, mark all over it, make tucks and darts that won't be in the finished garment and otherwise perfect the pattern before cutting in to the good fabric. So thinking, I cut a mock up of the sacque a few days ago and tried it on:

It is just my basic bodice pattern with length added to it, all around, and the darts in the front not pinned in. I also angled the back seams of the back bodice to an A-line shape so that it would flare out around my hips. For the first mock up, I didn't think it was too bad. It was suggested (and I agreed) that a bit more room in the bust would be nice. And a bit more width all around the hem would be nice as well - in this mock up, you can see the back and the side seams are opened from the hem to the waist to allow the pieces to "spread" over the hoop:

I accordingly made the adjustments to the mock up and traced the finished pieces on to brown paper. I did NOT cut a new mock up from the adjusted pattern. And that was a mistake!

To create more width across the bust, I slashed from the bottom of the pattern up through the mid point of the bust and spread the slash to create width across the bust. When I sewed the pieces of the sacque together and tried it on, the bust indeed was more roomy but there was a LOT more width at the front hem. The extra fabric hung in loose, ghastly, triangular folds. I felt like any breeze would whip right up under those flappy bits and blow the sacque up around my head. Not a pretty vision. 

So, I received confirmation the darts could be used in sacques like this. I pinned in a dart to take in the extra triangular flappy bits of fabric on each side of the front. The front now lay smoothly, but there were fitting issues in the chest area. Because the neckline and the top chest were fitted smoothly and the bust was fitted with EXTRA in the bust, little wrinkles radiated at an angle down from the neckline to the armpit. It just looked bad. 
nasty ugly radiating chest wrinkles

And to top it off, the darts I had sewn in to take in the excess fabric hem, because the bust is not smoothly fitted (being looser), the tip created a little dimple at each nipple-point. Now that really looked bad!
Nipple Nightmare!!!!!!

I had a frustrating hour or so last evening. I had sewn the body of the sacque together, finishing the hem, finishing the neckline, finishing the front opening and make hemmed slits at each side seam, a la the Met Museum sacque, and the only thing holding me back from going on with the sleeves was the awkward look of the bust area. 

In the end, I resorted to disguise. With the sacque on, I extended the darts to up and over the bust, taking in the excess fabric. This made the fit much smoother. Not totally perfect, but a lot better. 

To hide the dimply nipple points in the fabric I decided to put trim on the sacque (originally I was just going to trim the sleeves). I now have the trim on the front sewn down. Just a flat band of sage green fabric sewn to cover the dart seam. Now the fit is much better and honestly, you can't tell it IS darted unless you look at the way the stripes are angled and figure that yes, there MUST be a dart there somewhere. From the bust down it fits loosely. I'm happy with it. Still upset that I had to go to all that trouble but well, that just teaches me to ALWAYS MAKE A SECOND MOCK UP! In this case, I just wish I hadn't worried about making the bust bigger and just went with the original mock up. I would much rather deal with a bust that may be a teeny bit on the tight side than have to deal with awful dimply darts and chest wrinkles, etc. etc. etc. If I ever make another sacque outfit, that is what I am going to do. And possibly make the sacque a little bit longer next time. I may do that. I feel so bad about this one, making a nice, new fresh one with no disguise or mistakes would be relieving. 
The sacque with the extra dart length pinned in, the trim fabric kinda-sorta draped on where it would be sewn and the back ties crossed and brought to the front and tied over the bump.
In these pictures you can see the basic sleeve mock up. I decided to go with a double-puff upper sleeve and a loose lower sleeve, to be worn with or without undersleeves depending on the weather. The mock up just has the upper sleeve lining fitted to the arm, since the puffs will be mounted on top of the smooth lining. Right now it kind of has an 18th century feel to it, with the sleeve flounce and the smoothly fitted upper sleeve! It will look much more 1860's when I get the puffs on and add the undersleeves. 

I hope to get the sacque finished today! I have to put a band of trim around the hem of the sacque, make and set the sleeves and add the hook and eyes to close the front. I may add decorative buttons covered in the same fabric as the trim. And then I have to make and add the little white collar and the undersleeves. 

That sounds like a lot. Maybe I won't get it done today. But soon!

Love,
Sarah

Wednesday, April 18, 2012

The Sacque and Petticoat of Purple, Part 1: The Petticoat

I have explored wrapper-making a little bit. Wrappers, as we all know, were one of the "casual wear" options of the 1860's.  Something a lady may wear in her home before dressing for the day, or something a more working class lady may have worn for hard manual labor. Or something that could be conveniently worn for pregnancy due to the possible loose front (although certainly proper "dresses", not "wrappers" per se, could be worn throughout pregnancy as well). This is the one I am using as my inspiration image for the black lawn wrapper, as of  yet a pile of fabric sitting on the sewing table:

This time I am exploring the sacque and petticoat (or saque or sack). It basically consists of a skirt (the petticoat) and a loose fitting top (the sacque) that could vary in length from hip to knee. In the past I have never found this style of dress very attractive, but , well, I suppose tastes change with time. I actually quite like this style now and I think it will be a nice addition to my wardrobe. Something different. Like the wrapper, this ensemble is "casual wear". And also like the wrapper, the loose fit is very convenient for pregnancy, although most certainly this style is *not* necessarily "maternity-only"!
original 1860's sacque and petticoat from the Met museum

Since the baby is due in August I will be going through the hot months of the year very pregnant indeed. I decided to use a very lightweight cotton for this outfit so as to be as comfortable as possible during our humid and long Illinois summers.
Sacque and Petticoat Pattern from Past Patterns

Yesterday I finally started on this outfit. I have been dreading actually cutting into the fabric because it has been so hard to find originals to look at, either extant sacque's or images of women wearing them! I wasn't exactly sure what I was going to do as far as style and fit. I figured that I could at least make the petticoat with no worries since it is basically the same as any other skirt; cut the panels, sew the seams, add the hem facing, balance the waist, gather or pleat and attach to a waistband. I made the skirt 180" at the hem, and finished it with a 4" wide facing of white cotton:

The top of the skirt was folded down to the inside. More was folded down at the front than at the back, to make the skirt longer at the back. You can somewhat see this here in this inside picture of the waist:

To draw up the fullness I decided to cartridge pleat, or gauge, the waistline. Pleats are also common for skirts of this era but with a lightweight fabric gauging seems to work best, plus I love doing it and I somewhat detest pleating. Here is the gauging from the outside:

And from the inside; two rows of parallel running stitches were made along the folded top edge of the skirt and the resulting little pleats were whipped, one stitch to each pleat, to the waistband:

It has to sit a little high waisted to go over the bump which results in the hem at the front being a bit higher than the back, but it works quite nicely I think! The color in this picture is a little brighter than the actual fabric color and the color in the previous pictures is a bit washed out compared to the actual fabric color. The real color is somewhere in between; a nice, blue-grey, lilacy purple. :)

Love,
Sarah

Friday, April 13, 2012

Making a Basic Baby Gown Pattern and A Linen Dress for Anne

I took a little break from Civil War sewing this afternoon, in between making lemon bars, putting dinner in the crock pot, doing school with the boys, cleaning the henna out of the tub (the vision of a shower and tub after rinsing a headful of henna out of the hair is not a pretty sight) and refereeing many friendly wrestling matches that ended up too boy-energy-violent, to draw out a quick pattern for an A-line baby gown. There are several vintage gowns that have inspired me and they look easy enough to make, but it does help to have a plain, basic pattern to start with. So, I made a plain, basic pattern and tested it out today. I think it will work nicely, and now I can move on to more intricate styles when I have another few spare moments!

Back when the boys were little I made their Civil War gown pattern based off a onesie. It always worked really well, so that's what I did for this pattern. So easy to do! So, if you want to make a dress like this too, here's how to do it:  (or at least how I do it - no doubt there are other/better ways to do this!)

Get a big sheet of paper or cut apart a paper grocery sack (if you want to be cheap and stingy like me) ;) and draw a long vertical straight line on it. Then, select the onesie.

I always use a onesie that errs on the side of a bit large. Onesies stretch, and most gowns I make are of fabrics that are not meant to be stretchy. So you have the onesie. Okay. Fold the onesie in half and lay it on the paper so the fold is against the straight vertical line:

Trace around the neckline, shoulder and armscye. I had to fold the sleeve out of the way to trace the armscye. It probably isn't exact, but it's good enough. :) Here is what you should have after that:

To make the skirt portion, simply measured down how long you want the dress to be along the fold line (in this case, I wanted it to be about ankle length so I made it about 16" long) and draw an angled seam from the armpit down to the hem. Draw a curved seam for the bottom edge of the dress and there ya go. Easy peasey.

To make the finished pattern, take the pattern piece you just finished making and lay it on fresh paper. Trace around it, adding a 3/8" seam allowance all around (or whatever seam allowance you like using - I personally like using 3/8" for little things) and a 3" seam allowance at the bottom for a nice large hem. Mark the piece as "Back".

To make the front, trace around the back piece but omit the 3/8" seam allowance at the center line. This is so the dress can have a seam at the center back, to allow for an opening for the head to slip through. I also cut the front neckline down a little more than the back neckline:

Here are the finished front and back pattern pieces:

To make the pattern for basic little sleeves, trace around the onesie sleeve: (again, this is probably not exact but it is good enough!)

Then trace that piece on fresh paper, adding seam allowance and 1" for a hem.

To make the dress, I cut two backs and one front and two sleeves. The fabric is from a thrifted linen gown. I loved the fabric so was happy to find a use for it!

First I sewed the center back seam, leaving a few inches unsewn at the neckline. I finished the seam with a zig zag stitch and stitched down the seam allowance on the placket to finish off the edges:

I was tempted to leave the front completely plain, but I thought this lovely cotton lace, a beautiful gift from Natalie at A Frolic Through Time, looked so well with the linen that I just had to use it!

After sewing the shoulder seams, I pinned and sewed the sleeves into the armscyes while the dress was still flat. Now, I usually try to avoid this method of setting sleeves in but on a garment so small I think this is the only method that will work well when using a machine.

I pressed up the hem on the sleeves and then pinned the side seams of the dress:

After sewing the side seams it was just a simple matter of hand stitching the hems in place and finishing the neckline. I finished the neckline on this dress with a piece of bias binding. It would be easy to add a little ruffle or tiny collar to the neckline, too,  but this time I opted for what was simplest. Besides, the baby-fat double chins most infants have would hide any collar or neck decoration anyway. And who wants to be distracted from looking at chubby baby chin adorableness?

I whipped up a little baby cap to go with the gown out of the scraps of linen that were left over. There was just enough lace to lightly gather and attach to the cap, too!  

I so can't wait to make a few more gowns with some style variations, like a yoked gown with a little ruffle at the hem, a gown with tucks at the shoulders and maybe some with smocking. My poor wardrobe is going to be ransacked for blouses and dresses that I no longer wear often so I can cut them up and use them for baby clothes!

Love,
Sarah