Tuesday, May 30, 2017

1940's Casual Summer Outfit ~ Wearing History Sunkissed Sweetheart Separates

The kids are out of school for the summer and the last week has been a blur. So far our days have been filled with baseball, playgrounds, trails at local parks, sidewalk chalk in the driveway, bike races with neighbor kids, telling ghost stories on the street with the neighbor kids, gardening, frozen lemonade and mass watchings of the old PBS kids show Wishbone on YouTube. (They all LOVE it! Why did they take this program off the air?! It was my favorite as a child.) And I've had poison ivy for over two weeks. And then got a sunburn on top of it.


But, I sewed! This time I jumped into something completely different and made up a version of the Sunkissed Separates from Wearing History. I've been kind of tired of Victorian sewing and wanted to make a few things I can wear for everyday. 


I purchased the e-pattern so had to print and assemble it before I could start. This whole project took me a really long time since I only worked on it a little each day. I wanted to have it done by Memorial Day though, so I did make my deadline (just barely). Vintage sewing is a ton different than mid 19th century sewing. I feel like such a, as my oldest son would say, noob. 


This outfit is basically a glorified mock up. I wanted to see how the pattern would fit and if any adjustments needed to be made before I make up my real fabric - a lovely green and pink Hawaiian print cotton that I've had in stash for many years. The fabric for this one is truly vintage, at 34" wide and with a few age spots here and there. I got it so long ago I cannot even remember when, at a thrift store. I probably paid less than a dollar for all of it. I had 4 yards and it was just enough for the top and the short version of the wrap skirt. 


I cut a size 16 and the only adjustment needed was to take some width off the back piece of the top. I knew going in that I have a narrow ribcage so was expecting that adjustment. Other than that, the fit is pretty much perfect! I love how the armscyes come up to right under your arms. One thing I hate about modern blouses with set in sleeves is that so often they are baggy on the shoulder. It makes for a pretty unflattering line (at least, for me) and is hard to move in. I like the slim fit of the sleeve, too. It is comfortable and easy to wear. 


The gathered sections on the top and on the skirt hip were hard for me to figure out. The instructions call for facing a slit where the gathers go, then gathering up the long edge and sewing it to the faced slit. I followed the instructions and it came out fine, but still made no sense to me. For the skirt I just thought of the gathered-and-slashed area as a dart, and that made sense to me. I didn't face the slit on the skirt, just sewed it like a dart with one edge of the dart gathered. It worked!


Instead of a hip tie on the inside of the skirt to keep the wrap section closed, I sewed on a hook and eye. I thought this would reduce any bulk at the hip that would come from fabric ties on the inside of the skirt. 

The other change I made to the instructions was the finishing of all the edges. All the raw edges of the top and the skirt are meant to be faced with bias. To me it seemed easier to trim off the seam allowance and just bind the edges with bias instead. So that's what I did. And I like how it came out. I will probably do the same thing with any other versions of this pattern that I make. 


I'm super pleased with how this came out and am looking forward to make up a version with a long skirt in my green Hawaiian print. I also plan to make the shorts but maybe with a tuck-in blouse instead of the wrap one. 


Thank you to Judah for taking these pictures for me. And! Speaking of my kiddo, I just must brag on him a little even though its not sewing related. He was selected for the all star baseball team this year and had his game this weekend. I am SO PROUD of this kid!!! He is SO good! What a wonderful thing to see your baby growing up and doing so well in something he loves so well. Future MLB player, right here! (no, I'm not just saying that!) ;) 


Happy beginning of summer you guys!!

Wednesday, May 24, 2017

A Large China Head Doll

So, I found her at the antique mall. She was sitting on a wooden shelf, folded up on herself. I am not a doll person at all but I went over to have a closer look. $10! I wavered a little, but ended up bringing her home and I am so glad that I did! I just love her.
She has a few long, thin cracks and her face has tiny brown spots, but overall
she is still very lovely!

So does Anne, who insisted on cradling her in her arms the whole drive home, whispering to her. "Tell me your story." she said. Then she'd pause, and exclaim complainingly "MOM! She's not telling me a lot yet."

Um. . .ok.

But isn't she beautiful?! I know almost nothing about dolls and although I've made a few cloth dolls for the girls, china head dolls are completely out of my realm. But she looks. . .right. Is she an original? Is she a reproduction? Is her body original? Her clothes almost certainly aren't. . .they are of a variety of materials and construction techniques. Her feet seem too large and bulky and her arms are fat. But her head looks real enough. I need to do more research. But in the meantime, here are some photos of my pretty lady.


We named her Julia. For Julia Grant, of course. ;)


Sunday, May 14, 2017

My Mothers!

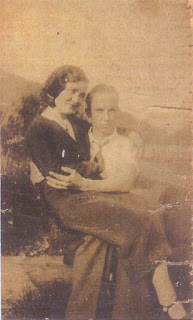
Happy Mother's Day to all you wonderful individuals who have ever taken on the enormous responsibility of caring for another living creature. I am so thankful today for the women who have shaped and influenced my life, especially my own mom and my grandmothers. I thought I'd share a few of my favorite vintage photos in honor of the day. I don't have very many older pictures of my family so these are incredibly precious to me!
Great-great-grandpa William with great-grandma Etta
and great-uncle Albert, c. 1916. This is a sad photo to me,
since their young mama had passed away, leaving a widower
and two very small children.
And doesn't Etta look almost exactly like my Anne?!

My teenage great-grandma, Etta, and great-grandpa Floyd
c. 1930 

And their daughter,
little Marjorie, my darling grandmother, c. 1933 or 1934. My own little Rose
resembles her so much!

Marjorie, my beautiful grandma. We
share the same birthday. c. 1945


Marjorie, c. 1950

My grampie, Harold and grandma, Marjorie on their wedding day.
This photo hangs in my sewing room and I can rarely look at it
without shedding tears of both happiness and grief. Both of my beautiful
grandparents are now free from the bonds of this earth, but they live forever in my heart. 

My other gorgeous grandma, Judy and my grandpa, David
c. 1960
My own amazing mom and myself, c. 1987! Isn't she beautiful?! She still is!


Thursday, May 11, 2017

Yep, Another Corset!

The weather this week! Just. . .ugh. I had a lot of plans for the yard this week but it's been drizzly and grey for what seems like forever. And now it's hot and humid on top of that. It's fantastic growing weather but. . .I haven't planted much yet. I pray fervently for a drier weekend! You know they say to plant after Mother's Day, so I'm still on proper schedule if the weather cooperates!

So I decided to get my new corset out of the way since I've had to spend that time inside. I really didn't want to make this but I'm glad it's done. I love making corsets but the problem is that I loved the last one I made and I am not ready to say goodbye to it! But my mistakes when making it have at last proved true "you reap what you sow" (in this case, sew!) and my last one has become really uncomfortable to wear for extended periods of time since it laces completely shut. 

Corsets can be scary because you have to really address what your body looks like, become very familiar with any and all irregularities, lack of symmetry, measurements, squishy flesh vs. firm flesh and all those kinds of uncomfortable things that, I'm sure, the majority of us would rather ignore. Add in a body that has gone through six pregnancies, six c-sections and six breastfeeding babies and. . .yeah, not a fun thing to do (OLORD WHAT DID THEY DO TO ME?!). A woman's body goes through so many changes. I finally lost the last of my baby weight late last year and although I was happy to reach my goal (after 10 years!) I am still trying to get used to different shape/proportion/measurements and dealing with approaching corsetry from a different angle - trying to help boost and shape things rather than squish it all down! Haha. It can be depressing. If it's not one thing it's something else! 

So I wasn't excited about this project at all. The only sort of interesting thing about it is the corded underbust sections. I have always wanted to try this feature but was always in such a rush to get my corset done I never took the time to do it. I tried it this time around and am happy with the additional support it gives. It's decorative, as well. I am not sure if this type of cording was really popular in the 1860's as I see this far more frequently on later corsets (1880's on up) but since I will be using this for a bustle-era dress anyway I went with it. I don't know if it really affects the look of the corset or the dress that is worn over top, but it does feel nice to wear since there's additional stiffness and support. For me, I have found I have a really small ribcage/underbust measurement (a 28 band size is no fun and bras are freaking expensive) compared to a more average bust and the cording helps pad out that area below the bust just a little, so the boobies don't slip down and get smashed inside the corset. ;)

And I have a much better lacing gap! I'm happy about this! This makes the corset way more comfortable than my last one, which didn't have much of a gap at all and towards the end was lacing shut. 

I made one other thing this week: earrings! I had a few beads left from Anne's new necklace so I tried making a simple pair with some cheap headpins and hooks from the craft store. I like them. I want to make more. Of course, I hardly ever wear earrings so there is no need to make more but the process was fun! 


Friday, May 5, 2017

New Summer Sheer Plaid with Low Body

I posted a few photos of this dress in my last post but thought that this dress deserves its own post! ;) 1. I really, really love this dress and 2. I don't really have anything else to blog about since I have done absolutely nothing, sewing-wise, this week (unless you want to count 5 garments that needed various mends or new buttons after last weekend. I just finally got everything finished up and put away yesterday.)

Now, a low body on a grown, adult woman? Wasn't that neckline usually reserved for very young women or for evening wear? Well, yes. At least, that's what I've always been inclined to believe and that is what a lot of primary evidence supports. Usually, it seems, the most common bodice neckline for a grown women, during the day, is the high neckline, whether jewel, or V, or slightly squared. But after getting back into seriously perusing fashion of this era after a few years of apathy and then a few years of no reenacting, I have found that the general consensus now is that women, even those of a "certain age", can wear this neckline during the day, if the neckline is covered up with a fichu (which can be, and often were, quite sheer). It is suggested that women who were more well to do could, and sometimes did, wear fashions that are normally considered more "youthful".


This intrigued me and on a whim I pulled some fabric off my shelf that I have had for a number of years. I bought this sheer plaid cotton from Wal Mart a very long time ago and never used it. The plaid was really big but I liked the colors so I brought it with me during my move and planned to make it up someday, but, sheer fabrics are harder to work with so I had never touched it.

It worked well for this style of dress, though. I made a fresh mock up of my basic bodice pattern, drew a new, low (though not deep) neckline, tweaked it and used it to make the lining. The outer fabric was cut wider, to give me a few inches on each side to gather at the waistline and neckline. Once that was done the dress was finished like any other day dress with the waistband set on, skirts gauged and whipped to the waistband edge, the armscyes piped and the sleeves set in.

I was running seriously short of fabric when I got to the sleeves. I didn't realize when I started just how big this plaid is. Plus, it's an uneven plaid so even more of a pain in the butt to work with. So instead of piecing and pulling my hair out over sleeves that didn't match up quite right, I went with another period practice of just not caring. ;) The plaid is not matched on the sleeves and the upper puff sleeve and loose lower sleeve have the grain running in different directions, but I decided to not care and in the finished dress it's really not too jarring, right? The upper sleeve has a lightweight lining to support it and the lower sleeve is simply hemmed all around the edges and left open at the inner arm.

For proper full dress undersleeves would be needed (possibly not during really hot summer days) and a fichu worn. I made my fichu out of the skirt of a cotton organdy dress that had seen better days. After wearing it last weekend I've decided that its too wide at the shoulders and I had a mishap when the edging on the front caught on my belt buckle and was torn for a few inches. I think I will cut it down and edge it instead with a puffing or ruching of the organdy (which was my original plan, anyway, so I already have the strips cut and sewn and ready for hemming) and hopefully that will improve it.

This was a really comfortable dress to wear last weekend. It is far more comfortable than my other dress and easy to move in, even with the low on-the-shoulder neckline. Among other things I was able to drive my vehicle to the event, change diapers, nurse my toddler, play baseball with my older boys and some others, run, jump over puddles and dance with my daughters to some wonderful live music! ;) This is definitely my new favorite dress!