Friday, April 29, 2011

Men's White Linen Regency Shirt

Progress has been made on my husband's regency ensemble. His breeches are finished and so is his shirt! My goodness, we now have a half dressed regency gentleman! Yay!

I will try to get some photos of David wearing the shirt and breeches tomorrow. In the meantime, here are some basic photos of the shirt.

It is not fancy by any means, but, I hope, will be serviceable and cool to wear this summer. It is made of the lightestweight linen that Fabric-store.com offers and washed up to be almost sheer. It definitely leaves nothing to the imagination. So it is a good thing that David will be wearing a waistcoat on top of this at all times.

It is a basic squares and rectangles shirt. I used the diagram from The Cut of Men's Clothes, the diagram from Everyday Dress in Rural America, 1783-1800, the extant shirt pictures from 18th Century New England and the repro shirt photos from Kannik's Korner. Since I have made many square cut shirts in the past for Civil War reenacting this was not very different. The only differences were good ones - no placket, and reinforcement pieces for the shoulders and armholes.  The shirt is also lightly gathered at the collar, and gussets inserted at the collar slits to make the shirt sit more comfortably around the neck.

The shirt is quite long, coming well down past mid-thigh to just above the knee. The sleeves are full and blousy. The width of the shirt body is cut at 30", based on the suggestion in Everyday Dress in Rural America, but I think I could have gone a tad wider and it would have fit David better. The shirt does fit, but the body is not as loose as I think it could have been and the sleeves do not drop off onto his arms as far as they might have. Next time, I think I'd cut the body width at about 34" or 35". Even 36"; and this would also give me a tad more width to gather into the collar for a fuller look there.

All in all, I'm happy with how my first 18th century style shirt came out. I adore the linen! Such a nice fabric to work with. As usual in my repro clothing, all the inner seams are sewn on machine and everything that can be seen from the outside is done by hand. Next up: Waistcoat and cravat! Here's hoping we'll have all this finished up by July. . .

Love,
Sarah

Monday, April 25, 2011

To Feast Upon Lembas; An Attempt at Elvish Way-Bread

"I thought it was only a kind of cram, such as the Dale-men make for journey's in the wild." said the Dwarf. "So it is," they answered, "But we call it lembas or waybread, and it is more strengthening than any food made by Men, and it is more pleasant than cram, by all accounts."
~ The Fellowship of the Ring

I must admit, I am a total geek when it comes to the Lord of the Rings. I love the movies, I adore the books and I really think my main interest in the SCA, and reenacting the medival period in general, is because I have such a strong fascination with Middle Earth. It's fantasy, not history, but it is actually more of a historical fantasy than anything, I think. It's not so fantastic as to be unbelieveable. I like that.

Reading about lembas this morning, and being quite hungry at the same time, I wondered if anyone, as geekified as myself, may have attempted to come up with a reasonable recipe for this way bread. I did a google search and lots of recipes popped up. A few looked somewhat reasonable but in the end, I decided to make up my own recipe based upon what I imagine lembas to be like and the descriptions given of the bread in the book.
"The food was mostly in the form of very thin cakes, made of a meal that was baked a light brown on the outside, and inside was the colour of cream." ~ The Fellowship of the Ring 

So based on the description, I wanted to come up with something that was thin, light brown on the outside, light in the middle and with a crisp crust. Gimli the Dwarf also described the lembas as being better than honey cakes.

So I thought to myself, what do I think of when I think of lembas? I think of the children of Israel and manna in the wilderness. I think of the taste of honey and butter. I think of a moist, crumbling crumb and a crispy brown, thin crust. Flat cakes, looking and feeling like hard tack. Of course, being a reenactor of the American 1860's era, I am very familiar with the flour-salt-and-water hard tack biscuits that were issued as journey food to the soldiers of the time. These biscuits could keep for months and years without changing much in appearance. In fact, there are still extant pieces of hard tack from this era that look just as edible and fresh as newly made hard tack.

A lot of the recipes I looked at included various spices, nuts and raisens and called for cooking the lembas on a griddle or stovetop. I wanted to have mine baked, as was described in the book. A lot of the recipes yielded a result that was quite heavy and scone like. I imagine lembas as more of a thickish cracker.

In the end, I made my own recipe. The finished result is almost what I was thinking of. The cakes did not turn out quite so crispy on the outside as I had imagined but I'm going to take a cracker trick and let the cakes sit in the oven overnight and hopefully, by tomorrow morning, they will be nice and crispy. Also, the inside of the cakes is a yellow-white color instead of being the "colour of cream". I attribute that to the yellow honey and butter in the cakes. Using white shortening and white sugar instead of butter and honey would probably yield a whiter cake. My lembas cakes have a crumbly texture, are flat with little leavening to, hopefully, boost their preservative qualties and are flavored subtly with butter, honey and a hint of lemon. They are definitely not what we think of as a modern "cake", soft and moist and loaded with sugar and eggs, but are sweeter, softer and definitely more palatable than plain hard tack. I wanted to keep things as simple as possible. So here is my take:

Elven Lembas:
Yield: 30 cakes appx. 1.5" x 2"

In a bowl combine
1 3/4 c. white flour
1 c. cornstarch
1/2 tsp. salt
1/2 tsp. baking soda

To above mixture, cut in
1/2 c. (one stick) of cold butter
til crumbly and moist

In a seperate bowl, combine
3/4 c. milk
2 Tablespoons lemon juice
1/2 c. honey
let sit for 10 minutes

Add milk/honey/lemon mixture to dry mixture. Turn out onto a floured surface and knead for 30 seconds or until dough holds together and is smooth. Divide in two. Be careful to not over knead the dough as too much handling will yield a stiff, chewy cake instead of a crumbly one.

Roll each half out to 1/4" thickness (no thicker) and with a sharp knife cut into cakes. I made mine appx. 1.5" x 2" but you can customize the size to whatever best suits your needs.

Place cakes on an ungreased baking sheet and bake at 300 degrees for 15-20 minutes, turning once halfway through cooking time. Tops and bottoms of cakes should be golden brown.

A thank you to my own little hobbits who were willing to dress up in their medieval garb and munch lembas cakes outdoors on this misty, gray, wet afternoon. Malachi refused to wear his attire but the older boys were perfect for the parts of Frodo and Sam. Gotta get SOME use out of these outfits before they outgrow them! ;)

Love,
Sarah 

Tuesday, April 19, 2011

Regency Shawls - Finding a Simple Solution

Planning an outfit for an event that is to be held in high summer can be problematic. Especially when, as it is today, quite chilly out and very rainy and windy. Today, a warm wool or velveteen spencer sounds like a good idea. But will I appreciate that in mid July? I doubt it.

I have been thinking about appropriate outerwear for the Jane Austen festival and decided a while ago that a shawl would be the most versatile and pratical piece to use over my gown. I can take it on or off as needed, it definitely adds to "the look", it can be worn in various ways for maximum visual flexibility and, looking at various period images, it seems shawls were very popular pieces.

I have a wool paisley shawl I got on ebay years and  years ago for Civil War reenating. I briefly considered using it, but decided against it because 1) I personally do not prefer the look of a big trinagular shawl paired with a slim, empire-waisted dress and 2) my shawl design is just not appropriate for the early 19th century. From what I've read, early paisley desings were more cone shaped and less elongated and swirly than later paisley designs. My shawl is also fairly loud and busy and I prefer something plainer and simpler.

Looking at the fashion plates at the University of Washington Fashion Plate Collection I found a variety of images depicting long, narrow rectangular shawls from the 1806-ish-18-teens period. I'm not sure if I can share images from their site on my blog, but if you click the link you can browse through their collections to your hearts content. :)

Vintage Textile also had some helpful photos of original regency era shawls. This silk gauze shawl from 1810-1820 is magnificent, and would definitely be ideal for summertime. I love the simplicity of the design and the simple bands of ribbon and colored blocks with a floral design at the edges.

This wool shawl, c. 1810, is also a lovely example. I was suprised at the dimensions of this shawl in particular. It is only 9.25" wide, and quite long. It has a plain red wool body with borders and edgings in beautiful, ornately woven panels.

You can also see several examples of period images of shawls at the Regency Fashion Page - Shawls

And a few other examples at Jane Austens World; Shawls:

I love the color and the strong greek key border on the shawl above. This design was also popular in the 1860's, so it is very fascinating to see it so popular 50 years prior as well!

Since I don't have much money to spend on our outfits (and David's is ending up costing the most; ironically!) I want to, if possible, create a shawl from materials I already have on hand. Something that would work well for my simple day dress and the white dress I hope to make before the festival. Nothing fancy or loud. I have some lightweight tropical wool in a pale blue/gray plaid, with thin stripes of red and white and black. I have had it for probably a year or so with the intention of making it into an 1860's dress one of these days. I thought the color looked well with my green cotton dress, so I cut a long strip of it, about 90" x 16" and, if all goes well, that will become the main body of my shawl.

I cut two smaller bits of wool to fringe out. Here is one part of the fringe with the horizontal threads pulled:

And here are the two pieces of fringe, finished and knotted:

My current plan is to sew the fringed bits to the end of the long wool strip. I have just enough gray silk left from my 1860's ballgown to sew a few bands of silk across the ends of the shawl and to bind the long edges of the shawl for a plain border. If I feel ambitious, I may attempt a greek key design on the border/bands with either black chain stitch embroidery or black soutache. Looking at the fashion plates whilst on the search for shawls I realized that most gloves I'm seeing are elbow length. The only longish gloves I have are pale gray leather, so they will match my shawl! I don't know if that is a good or bad thing. . .was matching, contrasting, or complimenting colors "in"?

Love,
Sarah

Friday, April 15, 2011

Brainstorming My Wardrobe for the Jane Austen Festival

With Civil War reenacting starting up full swing for us in the next few weeks I have had to put my sewing for the Jane Austen festival on the back burner. So far, no progress has been made since my last post on David's breeches. I did finish ordering the linen I will need to make his shirt, cravat and waistcoat (maybe two if I have time) but no sewing has been done.

Having some close deadline projects these past few weeks, which has meant sewing every day for at least a few hours, I have realized that I really cannot sew as much as I used to. With my three boys right now it is hard to find time to devote to uninterrupted sewing. If I do sew, they know I am not watching them constantly and they do things. Like flushing blocks down the toilet. Or spreading oatmeal all over the downstairs floors. You get the idea. So at this point in my life, my children need my attention a lot more than I need to be sewing.

Having realized that, I came to the conclusion that I really don't need multiple new dresses to go to the Jane Austen festival. Yes, I can get a little carried away. :P I'd pull out yardage from my shelf and each one would mentally become a regency style dress. I have been so worried that what I have already wouldn't be up good enough to wear to the festival and that I would be scorned, laughed at, mocked, ignored. All very silly illogical ideas, of course, but its how I felt. David asked me a few times why I was making new dresses since I already have several drawstring dresses from the popular Sense and Sensibility drawstring dress pattern. And, he's right. I do have those dresses. I could wear them. They don't fit very well since I made them when I was pregnant with Malachi, but I already have them. They are made. Clean. Ironed. Hanging in the closet. Ready to go.

I also have the dark green cotton regency dress I recently made, that fits well over my new stays and is definitely wearable. So, I have decided to bring that dress to the festival and, if I have time, make the era-hallmark "white dress" so popular at the time. The white dress will be useful for the dance at the festival and if I make it versatile enough it can be worn during the day as well.

The date David and I are shooting for is roughly 1806-ish, give or take a few years. I have been spending a few spare moments here and there researching gown styles of this period. Here are some of the dresses that have inspired me:

The first one is this dress from Sense and Sensibility's Vintage Image Section:

I love the simple style and the gathered bodice. I like the neckline shape of a wide shallow square and the straight front of the skirt, as well as the sleeves, which are short sleeves with detachable undersleeves. I also like the tucks. A lot of white gowns of this period, especially evening gowns, seem to be ornately embroidered. Needless to say I do not have time for that. I do like making tucks as they add a lot of visual interest, body, and are quick and easy to do.

The next two pictures are from the Nineteenth Century Fashions - A Compendium page. As you can see, they are similar to the dress from the Sensibility site.

This one has the wide, square neckline that I really like. It also has slight gathers across the front of the skirt, with a full gathered bodice above that. I like the sleeves, as well as the waistline sash. The embroidery is so beautiful but, as I mentioned, I will probably do tucks if I do any embellishment at all. I would not make the train as I cannot see it being practical for dancing or for using as daywear. If I am not mistaken trains on dresses were starting to go out by the early 1800's anyway.

This one has a similar wide, square neckline (hey, are we noticing a pattern here?) :P and it looks to have a similar bodice design to the dress from the Sensibility site. I really like the embroidery/trim around the neck. I think I like the flat bands around the neckline better than a softer, gathered-on-a-cord edge look that a drawstring bodice gives. It is neat, tidy and simple. I like the plain long sleeves. This dress has a fuller skirt, probably more so than what I would want as overly full skirts on regency dresses just make me look pregnant.

Soooo. . .here is the fabric I have to use for this dress. And yes, that is the price tag with the price I paid for the yardage. :) I have only about 5 yards left since I used a small portion to make undersleeves for an 1860's outfit. 5 yards should be enough though.

What I am thinking of doing is taking these two patterns from Janet Arnolds Patterns of Fashion 1 and combining them to get the look I want. There are features in both dresses I like. I will be making the gathered bodice, flat neck bands and back opening of the dress on the right. I will be using the skirt and the sleeves from the dress on the left. I think the dates on both these dresses are close enough to make the style work.

So, with the dark green dress I already have, plus this one, I should definitely be set for a weekend of visiting, shopping, taking tea, strolling and dancing. :) I'd like a few accessories - like a bonnet, a shawl, some passable shoes and a cross necklace. But I need to research more before deciding on anything for sure. . .right now I'm contemplating the Lucia bonnet pattern from Timely Tresses but I have almost no clue when it comes to appropriate shawls and such. Agh! Less than three months left to get all this together!

Sarah

Monday, April 11, 2011

Candle-Lighting Ball

The candle-lighting ball on Saturday evening was quite delightful. Delicious food, enjoyable dinner companions and fine music and dancing made this event very pleasant. No food to cook, dishes to clean up or boys to chase after. Once in a while, that is a nice thing! Here is David with Mr. Bernhart, one of the organizers;

There were *so* many lovely people at this event. Really! The attendees were a mix of pre-1800 rendezvous folk and then our 1860's group - all federal, no confederates. One beautiful lady in regency attire caught my eye and she later introduced herself as Teresa Sanders, of the Marquette Trading Company. She will be one of the vendors at the Jane Austen Festival in Louisville, KY this summer! If I wasn't excited enough about the festival before, I am definitely biting at the bit now! I CAN'T WAIT!!! :D!

The couple of honor was, of course, the esteemed Mr. Benjamin Franklin and his beautiful wife, Mrs. Franklin.

And here is our lovely dance mistress, the Lady Elaine, and her husband who provided us with wonderful music during the dances.

Thanks to all your advice and input, I did wear the bertha with  my dress. I ended up basting it to the neckline of the dress since I was afraid of it flying off during a Virginia Reel or some other active dance. I think I need to stitch the "pleats" (bias strips) down a bit more as a few kept wanting to flip up during the course of the evening. Other than that, it seemed to wear well.

I have more photos in my facebook album and you can see additional pictures at the Register Mail. I hope they bring this event back next year! I have always enjoyed the event they have here each August, and a dinner/dance is a perfect way to start the reenacting season.

Mrs. Franklin, who is truly a beautiful woman with a beautiful spirit, told me something very wise, and very true. It made me contemplate the reason why I keep doing 1860's, even though I admittedly have not enjoyed it as much as I ought to have the past few years. She said, "sometimes you will try out a lot of eras; but there will always be one that keeps calling to you. You may not know why, but there is something about it that keeps bringing you back." That is very true for me. I think I will always do 1860's even though I may dabble a bit in other eras. For me, it feels like home.

Love,
Sarah

Thursday, April 7, 2011

To Wear or Not To Wear; That Is the Question!

I posted my query on Facebook earlier today, but for my dear friends who may not be on Facebook, I seek your advice and opinions!

I finished the bertha earlier this afternoon and tried everything on for one last fitting before sewing on the hook and eyes down the back. The bertha sits on the shoulders like a big collar. And it just seems. . .so. . .loud.

I know berthas like this were worn. This big, yes. Lace was worn. It's just me, I think. I personally prefer plain and simple. So here is a picture of the dress with the bertha: (since this time I've taken off the lace trim around the bottom of the bertha and cut its width in about half, and narrowed the lace where the shoulders narrow, so its not as loose and flowy). In the finished version, if I use the bertha, I will have green leaves and blue flowers in a cluster at center front.

And here is a picture of the dress without:

How should I wear this on Saturday? :( I asked David, and, of course, he had no opinion. Or rather he absent-mindedly said that the lacey bertha picture looked "nice" and the plain one also looked "nice." How very helpful.

I guess I want to look right. I see so many dresses that are over trimmed or badly trimmed and I have a horror of appearing like that. But also many lovely dresses are made with no trim, and they could definitely be improved, and look more period correct, with the right kind of trim.

Alas! Alack! I think I'll go hide in my plainest and simplest homespun. :(

Sarah

Making Double-Puff Sleeves

For nice poufy sleeves, I have learned it is far more practical, and period correct, to construct them with a fitted sleeve lining. I have learned to Love the Lining. A fitted lining makes all the difference between something hanging limply and forlorn and something poufing out nice and perkily.

So yesterday I made the sleeves. For the fitted lining I measured my armscye and my upper arm where the end of the sleeve will be. I added an inch or two extra for ease. I drew out a shape on paper using these measurements, plus the width I wanted the sleeve to be at the longest point (my back arm) and the shortest point (just forward of the underarm). This was the lining pattern. I cut two in white cotton. Then using these same measurements reeeeallllly stretched out, I cut the poufs out. Two per sleeve. Here you can see the sleeve lining for one sleeve, plus the two puff pieces.

I drew a line on each lining piece in the middle, for placement of the top of the bottom puff/bottom of the top puff.

I ran gathering stitches around the top and bottom of each puff part. I gathered the bottom edge of one puff to match the bottom edge of the lining. Right sides together I sewed the puff to the lining.

Then I turned the puff to the outside, gathered the top to match the lining and pinned the top of the puff to the middle line drawn on the lining piece. I sewed it down and voila! One puff done.

The second puff was sewn on in the same way. I gathered the bottom edge of the upper puff to match the middle line of the lining. I sewed it to this line, right sides together.

The upper puff was then turned to the outside, and the top edge gathered to match the top edge of the lining. Voila! Second puff done!

Here is the sleeve sewn into the armscye of the bodice. A nice poufy puff sleeve. :)

I am currently working on the pleated bertha. So far I have the pleats sewn down on the front portion and the pleats laid out for the back. Hopefully the dress will be finished today! I'm using the instructions/photos from Katherine's page on her bertha as a guideline for mine. It will be complete seperate from the bodice, and right now the plan is to trim the bottom edge with lace as well as perhaps the bottom of the sleeves. This style is rather severe so I'm thinking the lace may soften the effect a bit. :) For now the lace is synthetic, from Jo-Anns, but when I get the money saved I plan to update the lace with cotton lace from an heirloom sewing supplier. I may add a flower or two at center front and at the sleeves.

Love,
Sarah

Tuesday, April 5, 2011

Ballgown Progress Update #1

Whizzing through the basic stuff so I can spend more time on the trim. I want to do a pleated bertha on this one and that is something I have never done before. Alas. I have til Saturday to come up with something.

I think I need to let the center front seam out a tid bit. It's a wee bit too tight as you can tell by the horizontal pulling across the bust. Otherwise, I'm happy with the fit. Princess seams are WAY easier to fit than darts and give a nice streamlined appearance. I like this bodice far better than my last ballgown bodice!

Sarah

Sunday, April 3, 2011

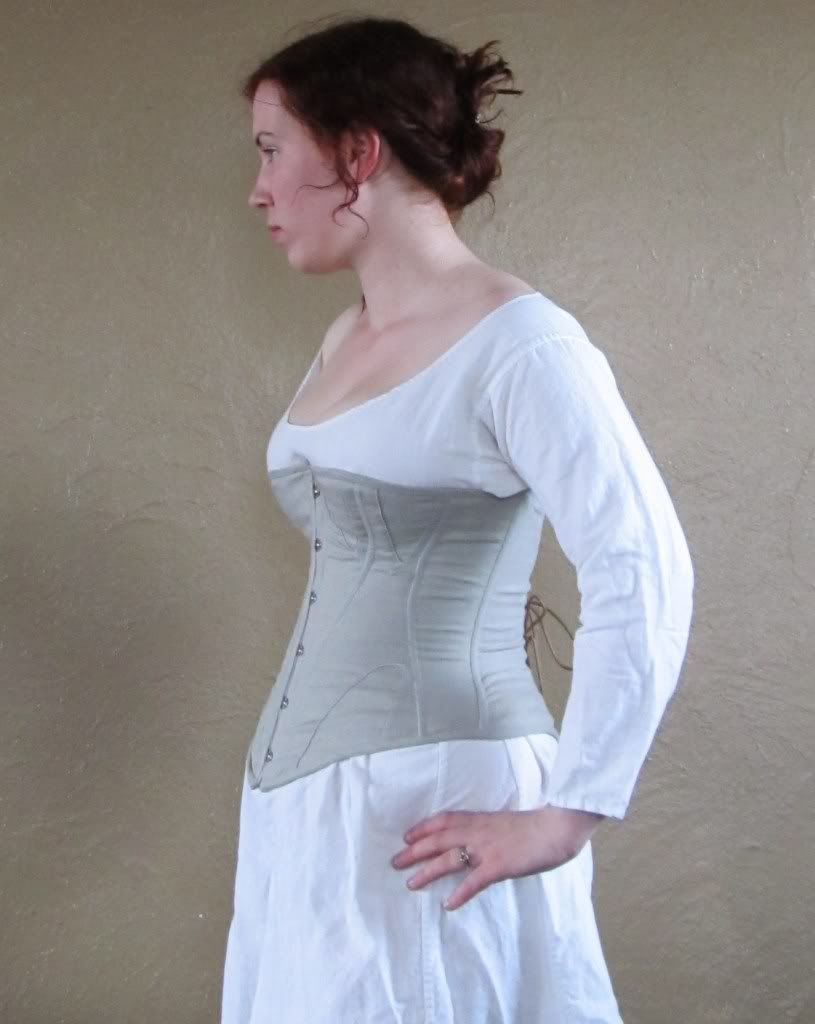
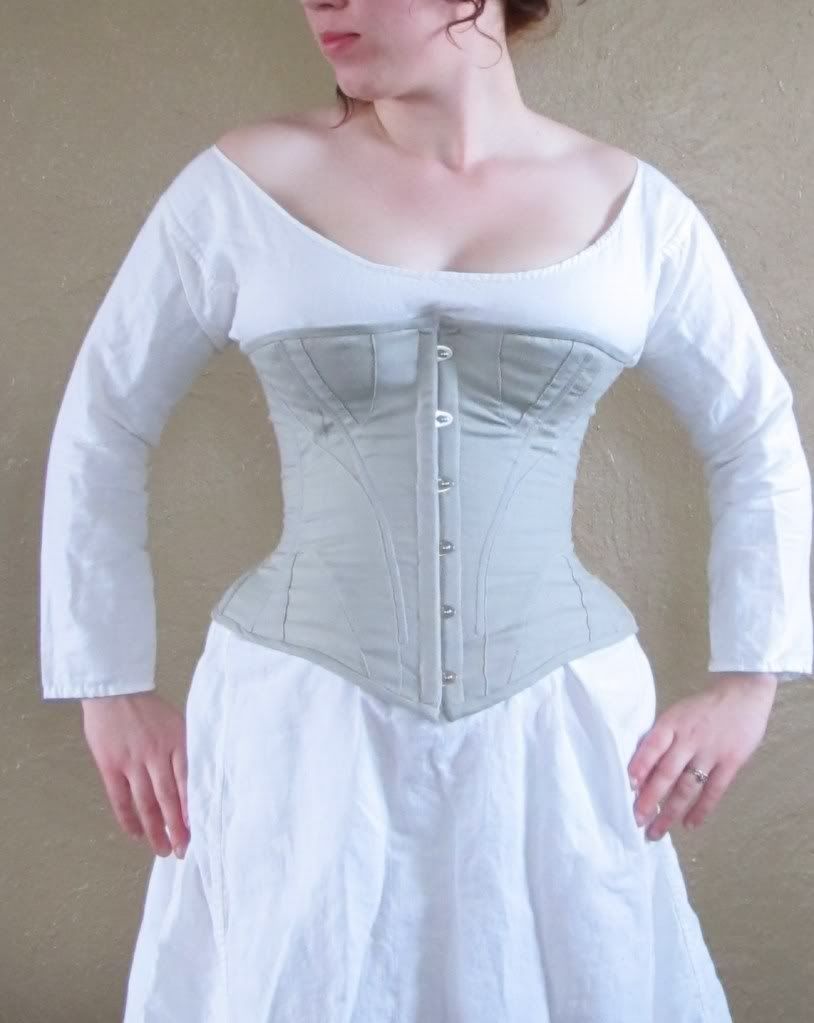
Gray Linen 1860's Corset - Finished!

The new 1860's corset is finished. Almost, that is. I want to add some reinforcement stitching on the outside of the corset at the points of the gussets, but I can do that whenever. For bodice fitting purposes, at least, the corset is wearable.

I like it - it's comfortable - but it definitely is giving a different shape than my last corset. More - what shall we say - choppy? There's the waist. Then POUF! - there's the bust! And POUF! - there's the hips! It will take some getting used to. I hope it works with my old dresses. I haven't tried one on yet to know for sure, but I *really* hope I don't have to sit down and do alterations to all my dresses. . .I detest alterations!
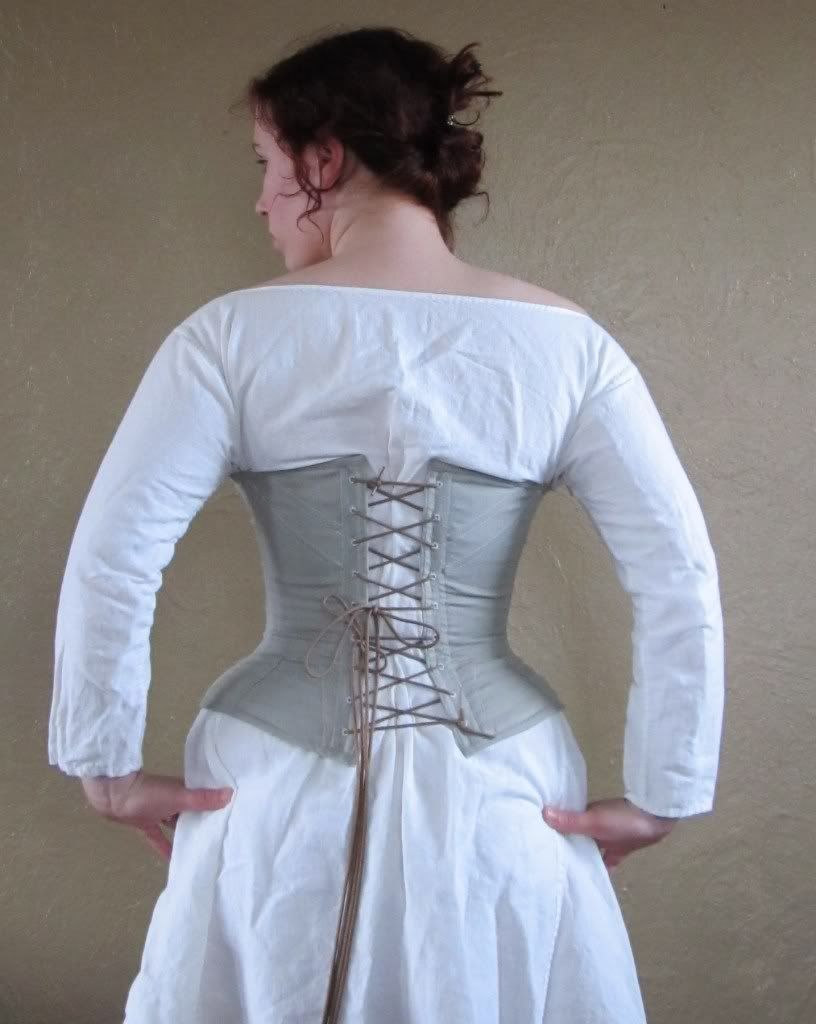
On to happy fitting days ahead, and progress on the Gray Silk Ballgown. :) Oh, and sorry for the medieval shift making yet another appearance in an era it does not belong in, but I need to make new 1860's chemises as the yoked ones I have do NOT work with this corset. So, for now, it will suffice.  

Sarah