
Many of my dear readers already are extremely knowledgeable about the ins and outs of period 1860's clothing, but for those of you who might not have looked into it as much, and perhaps would like to know a bit of the characteristics of gowns from this period, I decided to do an overview of my new dress rather than just posting pics and writing a random "coat sleeve, tucked bodice" etc. blub about it.
 Here is a full length view of the dress. Although there are many variations of style you can get into as you research extant original gowns, period photographic images and fashion plates of the era, this dress shows the basic shape and look of a dress from the era. As a broad overview, it has wide shoulders with dropped shoulder seams, a wide skirt hem and wide sleeves to create the illusion of a small waist. The neckline is high and is shaped in a shallow V. An alternate shape is a round "jewel" neckline, but I chose the V shape since it is much more flattering to me! The waistline ends at the natural waistline. On my corseted figure, this is the smallest part of my waist. The skirt ends a few inches above the floor. On the dressform it appears floor length, but I am a bit taller than my dressform.
 Here you can see the side of the dress. This also shows well the shape of a cage or hoop. As you can see, it pushes out a bit more in the back and is a bit flatter in the front. By the 1860's this was a common shape. Earlier hoops were rounder, and later fashion would favor a flat front skirt and a bustle in the back. My cage is one I made from a kit I got from Originals-By-Kay and is made from 7 wire rungs suspended from fabric tapes. It is about 108" around the bottom rung.
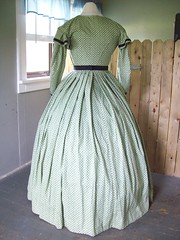 Here you can see the back of the dress. The back is fitted to the figure and the skirt is pleated all around to the bodice. On some dresses, you can find gauging or cartridge pleating in the back section of the skirt. For this one I was in a hurry so I pleated it all the way around. Note that the skirt is even at the floor despite the shape of the cage. The skirt on the dress is longer in the back by 3" than in the front. The panels of the skirt are sewn together evenly (I used five 45" wide panels for this skirt) and the bottom edge hemmed. To account for the difference in length at the front, side and back of the skirt the upper edge of the skirt is turned to the wrong side and ironed flat. 3" more fabric is pressed down in the front of the skirt than in the back. This creates a sloping line at the top edge of your skirt that will pleat or gather up to drape evenly across the cage.
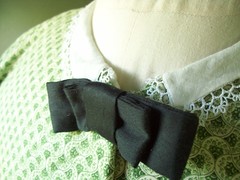 Here you can see the shallow V-shape of the neckline a bit better. To dress up the space between the edges of the collar I added a black bow. This space could also be filled with a nice brooch, or a different style of bow. The bow is just pinned on with a straight pin so it can easily be removed.
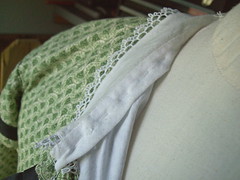 Here you can see how the collar is attached. The collar is a completely seperate item from the dress and is simply basted into the neckline of the dress with long running stitches. This enables you to take off your collar when it becomes grungy and wash it without having to wash the entire dress. This also keeps the neckline of your dress protected from your natural body oils and sweat. Cuffs or undersleeves (see previous post for a photo of me wearing this dress with undersleeves) serve the same purpose at the wrist.
 Adult womens day dresses opened down the center front. The front edges are turned back to the inside and slip stitched to the lining to finish the front edge. I used hook and eyes to close my dress although you can use buttons and hand sewn buttonholes as well. I find it faster and easier to stitch on the hook and eyes rather than sewing buttonholes. You could sew decorative buttons on the outside of the bodice but still use hook and eyes for the fuctional closure. I have done this with my silk dress (see three posts down). The hook and eyes I used here are white, since they are all that I can find locally, but I don't think white hook and eyes are period correct. In the past, when the stores still carried them, I used black hook and eyes.
  The Neckline: This finishes off the neckline for a neat look. You could also use plain bias binding here if desired.
  The Waist: You can use piping to finish off a darted bodice, or, as here a tucked bodice with a waistband. I piped both the top and bottom edge of my waistband. The piping at the bottom of the waistband reinforces that area to give you a sturdier place to attach the skirt.
  Bodice Style:
 Here you can see the darted lining fabric on the inside of the dress. I use two darts on each side.
  Bodice Back:
 Skirt/Bodice Closure:I attached the skirt directly to the bodice. I pleated the top of the skirt and then the pleated edge was stitched to the very bottom of the bodice.
  Since the bodice opens in the center front I wanted to make a dog leg opening so that the skirt opened slightly at the side. This prevents a seam from being down the front of the skirt. Here you can see the waistband hooked together and how the bodice closes over it.
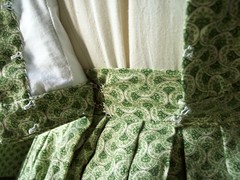 At the bottom of the skirt, I sewed on a hem facing rather than making a turned hem. This does two things. It preserves fabric because you do not need to cut enough in the skirt to allow for a turned hem (just 1/2" for a seam allowance) and it also protects the bottom of your skirt from dirt and wear. In this picture you can already see some dirt on the hem facing, and I just wore this dress once! The facing protects the dress fabric from this. When the facing becomes ragged, it is easily replaced. I used 4" wide strips of scrap fabric for mine, in a light color. This is sewn right sides together with the bottom edge of the skirt, turned to the wrong side and stitched in place with a large-ish running stitch that is long on the inside and short on the outside.
 So there it is! Not a comprehensive overview by any stretch of the imagination, but hopefully it will give you an idea of some of the common features of period dresses.
For starters, this new dress (or gown! call it what you like!) is commonly known in reenacting circles as a "day dress". A day dress would, of course, have been worn during the day. An "evening dress", as contrast, would have been worn in the evening for specific social events. So, this is a basic style cotton day dress. It can be washed but for my purposes, and for the longevity of the fabric, I will most likely on spot clean it and fully wash it perhaps once or twice a season, as needed.
Front View:
Here is a full length view of the dress. Although there are many variations of style you can get into as you research extant original gowns, period photographic images and fashion plates of the era, this dress shows the basic shape and look of a dress from the era. As a broad overview, it has wide shoulders with dropped shoulder seams, a wide skirt hem and wide sleeves to create the illusion of a small waist. The neckline is high and is shaped in a shallow V. An alternate shape is a round "jewel" neckline, but I chose the V shape since it is much more flattering to me! The waistline ends at the natural waistline. On my corseted figure, this is the smallest part of my waist. The skirt ends a few inches above the floor. On the dressform it appears floor length, but I am a bit taller than my dressform.Side View:
Here you can see the side of the dress. This also shows well the shape of a cage or hoop. As you can see, it pushes out a bit more in the back and is a bit flatter in the front. By the 1860's this was a common shape. Earlier hoops were rounder, and later fashion would favor a flat front skirt and a bustle in the back. My cage is one I made from a kit I got from Originals-By-Kay and is made from 7 wire rungs suspended from fabric tapes. It is about 108" around the bottom rung.Back View:
Here you can see the back of the dress. The back is fitted to the figure and the skirt is pleated all around to the bodice. On some dresses, you can find gauging or cartridge pleating in the back section of the skirt. For this one I was in a hurry so I pleated it all the way around. Note that the skirt is even at the floor despite the shape of the cage. The skirt on the dress is longer in the back by 3" than in the front. The panels of the skirt are sewn together evenly (I used five 45" wide panels for this skirt) and the bottom edge hemmed. To account for the difference in length at the front, side and back of the skirt the upper edge of the skirt is turned to the wrong side and ironed flat. 3" more fabric is pressed down in the front of the skirt than in the back. This creates a sloping line at the top edge of your skirt that will pleat or gather up to drape evenly across the cage.Collar and Bow:
Here you can see the shallow V-shape of the neckline a bit better. To dress up the space between the edges of the collar I added a black bow. This space could also be filled with a nice brooch, or a different style of bow. The bow is just pinned on with a straight pin so it can easily be removed.Collar:
Here you can see how the collar is attached. The collar is a completely seperate item from the dress and is simply basted into the neckline of the dress with long running stitches. This enables you to take off your collar when it becomes grungy and wash it without having to wash the entire dress. This also keeps the neckline of your dress protected from your natural body oils and sweat. Cuffs or undersleeves (see previous post for a photo of me wearing this dress with undersleeves) serve the same purpose at the wrist.Front Opening:
Adult womens day dresses opened down the center front. The front edges are turned back to the inside and slip stitched to the lining to finish the front edge. I used hook and eyes to close my dress although you can use buttons and hand sewn buttonholes as well. I find it faster and easier to stitch on the hook and eyes rather than sewing buttonholes. You could sew decorative buttons on the outside of the bodice but still use hook and eyes for the fuctional closure. I have done this with my silk dress (see three posts down). The hook and eyes I used here are white, since they are all that I can find locally, but I don't think white hook and eyes are period correct. In the past, when the stores still carried them, I used black hook and eyes. Piping:
Piping is used to strengthen seams and is made from the same fabric as the dress. I cut bias strips of my dress fabric and insert a narrow cotton cord in the center to use for my piping. Places I use piping are these:
The Armscye: Between the shoulder and the sleeve.
The Neckline: This finishes off the neckline for a neat look. You could also use plain bias binding here if desired. The Waist: You can use piping to finish off a darted bodice, or, as here a tucked bodice with a waistband. I piped both the top and bottom edge of my waistband. The piping at the bottom of the waistband reinforces that area to give you a sturdier place to attach the skirt. Bodice Style:Bodice styles are usually sorted into "darted to fit" and "gathered". Darted bodices have the fashion fabric and the lining darted as one to fit the figure. This style is usually reserved for wool or silk dresses. For some reason existing darted cotton dresses do not seem to be common at all. Gathered bodices have the lining darted to fit, but the fashion fabric is gathered at the waist instead of being darted. As a variation, I tucked my fashion fabric instead of gathering it to keep the pleated theme of the dress going on. It gives a smoother, more tailored line for my body shape than gathering would, as well.
Here you can see the darted lining fabric on the inside of the dress. I use two darts on each side. Bodice Back:Curved "seams" in the back of the bodice make a pretty line, and the small area between the bottom edge of these curves help add to the illusion of a small waist. Rather than a true 3-piece back, I find it much easier to make false seams or topstitched tucks in the back of the bodice. I pin and press them into place before stitching them down.
Skirt/Bodice Closure:I attached the skirt directly to the bodice. I pleated the top of the skirt and then the pleated edge was stitched to the very bottom of the bodice. Since the bodice opens in the center front I wanted to make a dog leg opening so that the skirt opened slightly at the side. This prevents a seam from being down the front of the skirt. Here you can see the waistband hooked together and how the bodice closes over it.At the bottom of the skirt, I sewed on a hem facing rather than making a turned hem. This does two things. It preserves fabric because you do not need to cut enough in the skirt to allow for a turned hem (just 1/2" for a seam allowance) and it also protects the bottom of your skirt from dirt and wear. In this picture you can already see some dirt on the hem facing, and I just wore this dress once! The facing protects the dress fabric from this. When the facing becomes ragged, it is easily replaced. I used 4" wide strips of scrap fabric for mine, in a light color. This is sewn right sides together with the bottom edge of the skirt, turned to the wrong side and stitched in place with a large-ish running stitch that is long on the inside and short on the outside. Attaching Trim:
To trim my dress I added black bands at the edges of the sleeve cap and the sleeve hem. Trim is sewn on with large-ish stitches so that the trim can be removed if you need to launder your dress (I learned this the hard way when black trim on a previous dress bled all over the dress fabric when I washed it!) and so you can easily remove the trim if you wish to update your dress with fresh trim at a later time. It is also much faster to attach trim this way. Here you can see the large stitches on the inside of the sleeve, showing where the trim is attached.
So there it is! Not a comprehensive overview by any stretch of the imagination, but hopefully it will give you an idea of some of the common features of period dresses.Now to make a few more, since currently this is the only dress I have that fits!
Love,
Sarah
That is nice, Sarah. As long as I have been sewing, there is much I still have to learn.
ReplyDeleteWish I had seen this when I began historical sewing! Man, the trial and error I suffered through!
ReplyDeleteI like that you dilligently use the piping. I always pipe the armscyes, waistband, neckline and the curved three piece back.
I have seen many disputes over where the piping was actually supposed to be, but I have also seen enough original garments to support the piping in those areas.
I think the little details like the piping make the difference between a 'costume' and a historical garment.
And I love that you use the hem facing, or as I call it, a false hem. Not only is it practical, and uses up those scraps, but once in a while, you get a glimpse of the facing and I think it actually makes the dress prettier.
Your dress is gorgeous, and I love that fabric!
Sarah, thanks so much for this! The glimpses at the inside of the gown are wonderful. And I, too, love that fabric!
ReplyDeleteDear Sarah Jane,
ReplyDeleteThis is an outstanding and informative post. I enjoyed the details you've shared.
Like the pictures you've included to explain the design.
You have gone to alot of work creating this lovely dress! It is inspiring to me how a young woman such as yourself uses her talent in such a great way. It's a blessing.
This past week-end the county I live in had a 150 year celebration and I thought of you as the reinacting personals were walking about the area.
It was so neat!
God Bless you and your sweet family.
~D~
You are soooo talented. I love this dress. It's gorgeous. God Bless!
ReplyDeleteLauren
What a beautiful dress! I loved reading about the details. Thanks for the explanation! :)
ReplyDeleteLove the dress! Its sooo beautiful and classy.
ReplyDeleteThat's a lovely dress Sarah! I adore the fabric -- I love green, and LOVE that pattern. I can't wait to start making some dresses that fit after my little blessing comes along.
ReplyDeleteThis is such a helpful post! And I love the green fabric. Can I ask, when you make the skirt closure, how far do you offset it from the center front?
ReplyDeleteNice dress and nice posting with a lot of great details. I would comment that v-necklines, including slight v-necklines don't appear to have been the norm -- the typical dress of the period appears to have had a jewel neckline -- that is, a high neckline with no dip in it. Also, in looking at original dresses, piping wasn't very common in the back of the bodice in the 1860s. These are just small things -- otherwise, good job!
ReplyDeleteQ - right. I mentioned jewel necklines as an alternate style in the post. I just chose to use a V for this one since I like how they look on my figure better. And also right, back piping was rarely used in this period, which is why I put topstitched tucks (false seams) in the back to create the curving lines. A true 3 piece back is another option but doesn't seem to have been as common as the topstitched tucks.
ReplyDeleteThe 3 piece bodice back is easier accomplished with a simple trick; Lay the back middle piece on the lining where it belongs, fashion fabric face up. Take the two side pieces to the ironing board and steam press the seam allowance on the curve, wrong sides meeting. Lay the two sides on the bodice back, allowing for the seam again and top stitch both sides to the middle back. This is an easy way to achieve the look with separate pieces. Your lining should be one piece including the middle and back in one.
ReplyDeleteThanks for the details.... nice blog.
ReplyDelete