

It is just my basic bodice pattern with length added to it, all around, and the darts in the front not pinned in. I also angled the back seams of the back bodice to an A-line shape so that it would flare out around my hips. For the first mock up, I didn't think it was too bad. It was suggested (and I agreed) that a bit more room in the bust would be nice. And a bit more width all around the hem would be nice as well - in this mock up, you can see the back and the side seams are opened from the hem to the waist to allow the pieces to "spread" over the hoop:

I accordingly made the adjustments to the mock up and traced the finished pieces on to brown paper. I did NOT cut a new mock up from the adjusted pattern. And that was a mistake!
To create more width across the bust, I slashed from the bottom of the pattern up through the mid point of the bust and spread the slash to create width across the bust. When I sewed the pieces of the sacque together and tried it on, the bust indeed was more roomy but there was a LOT more width at the front hem. The extra fabric hung in loose, ghastly, triangular folds. I felt like any breeze would whip right up under those flappy bits and blow the sacque up around my head. Not a pretty vision.
So, I received confirmation the darts could be used in sacques like this. I pinned in a dart to take in the extra triangular flappy bits of fabric on each side of the front. The front now lay smoothly, but there were fitting issues in the chest area. Because the neckline and the top chest were fitted smoothly and the bust was fitted with EXTRA in the bust, little wrinkles radiated at an angle down from the neckline to the armpit. It just looked bad.
 |
| nasty ugly radiating chest wrinkles |
And to top it off, the darts I had sewn in to take in the excess fabric hem, because the bust is not smoothly fitted (being looser), the tip created a little dimple at each nipple-point. Now that really looked bad!
 |
| Nipple Nightmare!!!!!! |
I had a frustrating hour or so last evening. I had sewn the body of the sacque together, finishing the hem, finishing the neckline, finishing the front opening and make hemmed slits at each side seam, a la the Met Museum sacque, and the only thing holding me back from going on with the sleeves was the awkward look of the bust area.
In the end, I resorted to disguise. With the sacque on, I extended the darts to up and over the bust, taking in the excess fabric. This made the fit much smoother. Not totally perfect, but a lot better.
To hide the dimply nipple points in the fabric I decided to put trim on the sacque (originally I was just going to trim the sleeves). I now have the trim on the front sewn down. Just a flat band of sage green fabric sewn to cover the dart seam. Now the fit is much better and honestly, you can't tell it IS darted unless you look at the way the stripes are angled and figure that yes, there MUST be a dart there somewhere. From the bust down it fits loosely. I'm happy with it. Still upset that I had to go to all that trouble but well, that just teaches me to ALWAYS MAKE A SECOND MOCK UP! In this case, I just wish I hadn't worried about making the bust bigger and just went with the original mock up. I would much rather deal with a bust that may be a teeny bit on the tight side than have to deal with awful dimply darts and chest wrinkles, etc. etc. etc. If I ever make another sacque outfit, that is what I am going to do. And possibly make the sacque a little bit longer next time. I may do that. I feel so bad about this one, making a nice, new fresh one with no disguise or mistakes would be relieving.
 |
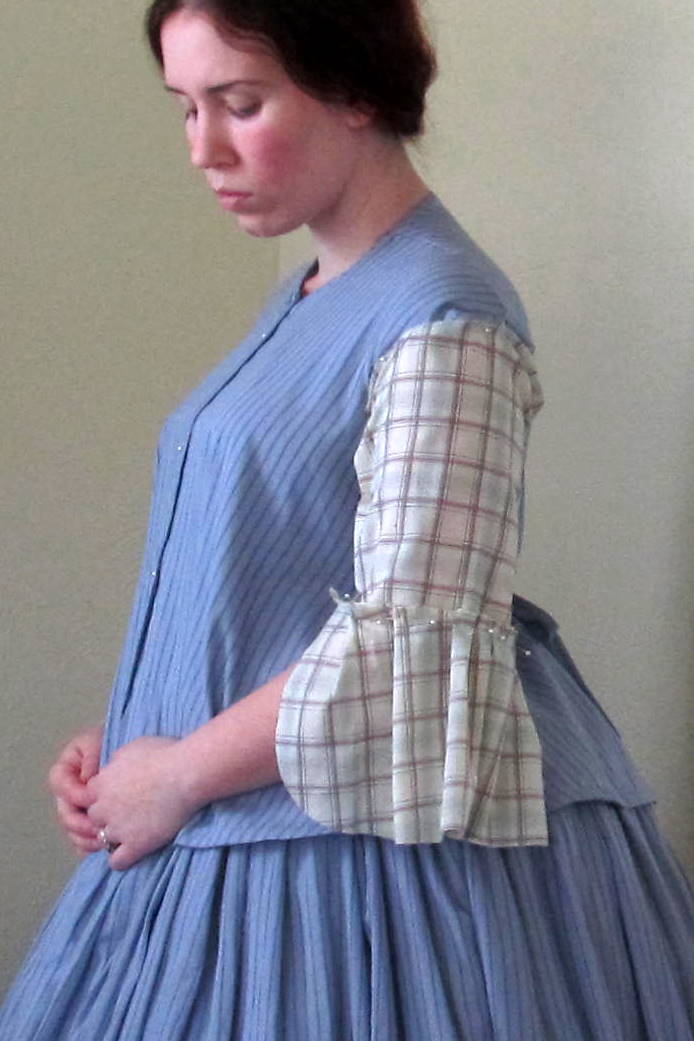
| The sacque with the extra dart length pinned in, the trim fabric kinda-sorta draped on where it would be sewn and the back ties crossed and brought to the front and tied over the bump. In these pictures you can see the basic sleeve mock up. I decided to go with a double-puff upper sleeve and a loose lower sleeve, to be worn with or without undersleeves depending on the weather. The mock up just has the upper sleeve lining fitted to the arm, since the puffs will be mounted on top of the smooth lining. Right now it kind of has an 18th century feel to it, with the sleeve flounce and the smoothly fitted upper sleeve! It will look much more 1860's when I get the puffs on and add the undersleeves. |
I hope to get the sacque finished today! I have to put a band of trim around the hem of the sacque, make and set the sleeves and add the hook and eyes to close the front. I may add decorative buttons covered in the same fabric as the trim. And then I have to make and add the little white collar and the undersleeves.
That sounds like a lot. Maybe I won't get it done today. But soon!
Love,
Sarah
Some projects just seem to be cursed, and no matter what you do you can't seem to get it right. I think how you solved it looks pretty however. And I just love the fabric!
ReplyDeleteI'm also making a sacque! Yours looks good despite the hardships :)
ReplyDeleteThanks for your sympathy and kind words! I decided to spend my sewing time today working on the sleeves, since (hopefully) there won't be any issues with those. So far they are making me happy. :) As long as this is wearable for our event next month I guess I shouldn't be so worried about it, but it IS so disillusioning to not have things go right. :(
ReplyDeleteI had the exact opposite problems with my sacque! The bodice fit wonderfully but the sleeves needed alterations. However, it wasn't that big of a deal, they just needed to be taken in a bit.
ReplyDeleteSarah, I'm always amazed at your creativity and sewing skills.
ReplyDeleteYou have my sympathies in the ill fitting department. I've been working on an 1870's bodice that has been nothing short of a nightmare. Thanks for the inspiration to keep working on it!
I'm sure you've heard this little trick to make darts lay flat... maybe not. I've found it helpful to NOT back stitch (saywhat?!) just tie your loose threads in a knot, then iron the bejeezes out of it. Keep up the lovely work!
ReplyDeleteThat is a hugely helpful tip about the darts! I remember struggling with backstitched darts for a while before hearing that tip. I didn't backstitch these, but think that they pucker because there is just too much excess fabric there. But then again, some things (Like some 1950/60's dresses) obviously have darts but are NOT really that fitted in the bodice, just the waist is nipped in. So much to learn still!
ReplyDelete